




最新下载


热门教程
- 1
- 2
- 3
- 4
- 5
- 6
- 7
- 8
- 9
- 10
在SpringBoot项目中接入DeepSeek大模型的完整流程
时间:2026-07-21 18:24:57 编辑:袖梨 来源:一聚教程网
一、基础环境准备
- 安装的 JDK 版本必须是 17 或 21,不能选择其他版本! 因为项目使用最新版本的 Spring Boot 3 和 Spring AI 开发框架。
推荐使用 21 版本,因为支持虚拟线程这个王炸功能。
二、新建项目
在 IDEA 中新建项目,选择 Spring Initializr 模板,注意需要确保 Server URL 为 https://start.spring.io/。
Java 版本选择 21。
选择 Spring Boot 3.4.4 版本,可以根据自己的需要添加一些依赖,比如 Spring Web 和 Lombok。
当然,后续通过修改 Maven 配置添加依赖也是可以的。
点击创建,就得到了一个 Spring Boot 项目,需要等待 Maven 为我们安装依赖。
小提示,如果 Lombok 依赖报错的话,可以手动指定 Lombok 的版本,pom.xml 代码如下:
<dependency>
    <groupId>org.projectlombok</groupId>
    <artifactId>lombok</artifactId>
    <version>1.18.36</version>
    <optional>true</optional>
</dependency>
三、整合依赖
可以根据自己的需要,整合一些开发项目常用的依赖。此处我们整合 Hutool 工具库和 Knife4j 接口文档即可。
1、Hutool 工具库
Hutool 是主流的 Java 工具类库,集合了丰富的工具类,涵盖字符串处理、日期操作、文件处理、加解密、反射、正则匹配等常见功能。
参考官方文档引入:https://doc.hutool.cn/pages/index/#%F0%9F%8D%8Amaven
在 Maven 的 pom.xml 中添加依赖:
<dependency>
    <groupId>cn.hutool</groupId>
    <artifactId>hutool-all</artifactId>
    <version>5.8.37</version>
</dependency>
2、Knife4j 接口文档
Knife4j 是基于 Swagger 接口文档的增强工具,提供了更加友好的 API 文档界面和功能扩展,例如动态参数调试、分组文档等。
参考 官方文档 引入,注意我们使用的是 Spring Boot 3.x。
1)在 Maven 的 pom.xml 中添加依赖:
<dependency>
    <groupId>com.github.xiaoymin</groupId>
    <artifactId>knife4j-openapi3-jakarta-spring-boot-starter</artifactId>
    <version>4.4.0</version>
</dependency>
2)新建 controller 包用于存放 API 接口,编写一个健康检查接口用于测试接口文档是否正常引入:
@RestController
@RequestMapping("/health")
public class HealthController {

  @GetMapping("/check")
  public String checkHealth(){
    return "OK";
  }
}
3)在 application.yml 中追加接口文档配置,扫描 controller 包:
server:
  port: 8080
  servlet:
    context-path: /api
######################################################
############          接口文档配置           #####################
######################################################
# 访问地址   ${server.servlet.context-path}/doc.html
springdoc:
  swagger-ui:
    path: /swagger-ui.html
    tags-sorter: alpha
    operations-sorter: alpha
  api-docs:
    path: /v3/api-docs
  group-configs:
    - group: 'default'
      paths-to-match: '/**'
      packages-to-scan: com.qianliuliang.love.controller # 配置扫描哪些包的接口要加入到文档
# knife4j config
knife4j:
  enable: true
  setting:
    language: zh_cn
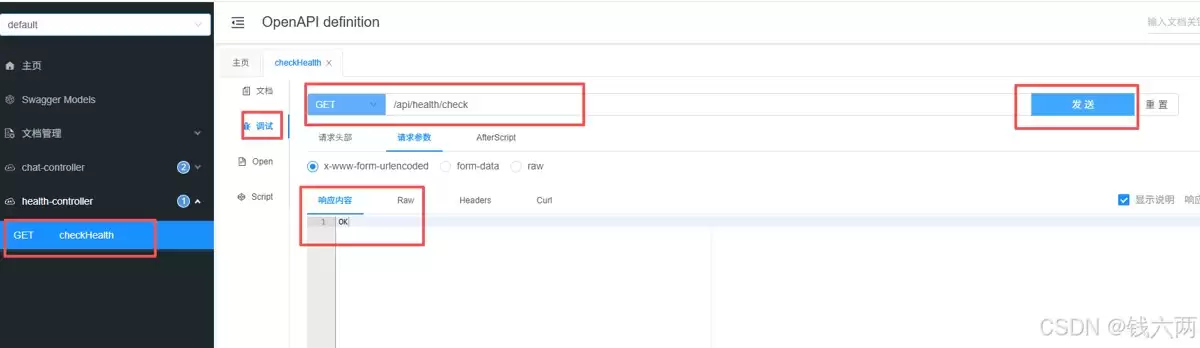
4)启动项目,访问 http://localhost:8080/api/doc.html 能够看到接口文档。
如果是要开发完整项目,除了引入依赖之外,还要编写一些通用基础代码,比如自定义异常、响应包装类、全局异常处理器、请求包装类、全局跨域配置等。
5)验证项目是否正常,直接在接口文档发起调试,成功返回"OK",说明项目初始化没有问题
四、大模型接入
使用SpringAI接口DeepSeek模型(需准备DeepSeek ApiKey)
1)在pom.xml中引入依赖
 <!--整合LLM-->
<dependency>
    <groupId>org.springframework.ai</groupId>
    <artifactId>spring-ai-openai-spring-boot-starter</artifactId>
</dependency>
2)在DeepSeek官网中申请APIKey
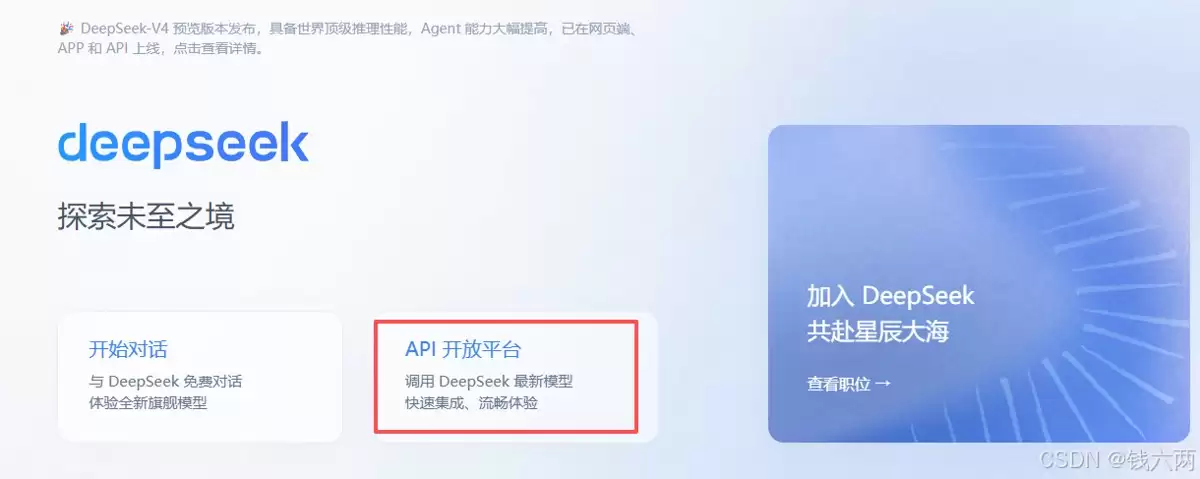
官网地址 https://www.deepseek.com/
操作步骤如下:
点击<API开放平台>
依次点击 、<创建API key>
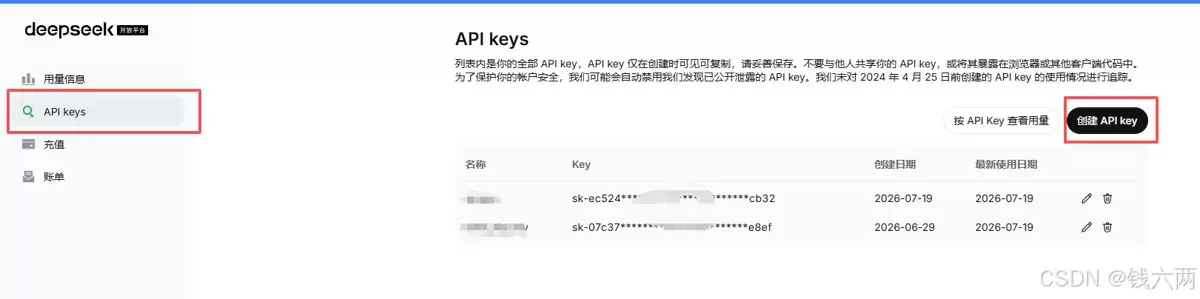
创建号API key后妥善保管,也不要提交到远端
3)在application.yaml 添加模型配置
spring:
  application:
    name: AI_LOVE
  #ds模型配置
  ai:
    openai:
      api-key: 你的apikey
      base-url: https://api.deepseek.com
      chat:
        options:
          model: deepseek-chat
api-key: 你的apikey 把申请的key填入
4)配置ChatClient bean
- 在项目中创建package 名称为:config;在包下面创建类,内容如下:
package com.qianliuliang.love.config;

import com.qianliuliang.love.advisor.MyLoggerAdvisor;
import org.springframework.ai.chat.client.ChatClient;
import org.springframework.ai.chat.client.advisor.MessageChatMemoryAdvisor;
import org.springframework.ai.chat.memory.ChatMemory;
import org.springframework.ai.chat.memory.InMemoryChatMemory;
import org.springframework.ai.openai.OpenAiChatModel;
import org.springframework.context.annotation.Bean;
import org.springframework.context.annotation.Configuration;

/**
 * chatClient bean
 */
@Configuration
public class Client {


    /**
     * 基于内存会话记忆的  client
     *
     * @param openAiChatModel
     * @return
     */
    @Bean
    public ChatClient chatClientWithChatMemory(OpenAiChatModel openAiChatModel) {
        // 基于内存的会话记忆,可实现上下文记忆会话
        ChatMemory chatMemory = new InMemoryChatMemory();
        return ChatClient.builder(openAiChatModel)
                .defaultSystem("你是一个智能恋爱助手!名字叫LoveDD") // 系统提示词
                .defaultAdvisors(new MessageChatMemoryAdvisor(chatMemory),
                        new MyLoggerAdvisor()) // 自定义日志
                .build();
    }

}
- 创建chat对话
import lombok.extern.slf4j.Slf4j;
import org.springframework.ai.chat.client.ChatClient;
import org.springframework.ai.chat.client.advisor.SimpleLoggerAdvisor;
import org.springframework.ai.chat.model.ChatResponse;
import org.springframework.beans.factory.annotation.Autowired;
import org.springframework.stereotype.Component;

/**
 * 简单会话
 */
@Slf4j
@Component
public class SimpleChat {

    @Autowired
    private ChatClient chatClient;

    /**
     * 普通文本会话
     *
     * @param msg 用户消息
     * @param chatId 会话id
     * @return
     */
    public String doChatWithString(@RequestParam String msg, String chatId) {
        ChatResponse chatResponse = chatClient.prompt()
                .advisors(advisorSpec ->
                        advisorSpec.param("chat_memory_conversation_id", chatId) //会话id/聊天室id
                        .param("chat_memory_response_size", 10))// 支持10轮会话
                .user(msg)
                //.advisors(new SimpleLoggerAdvisor())//日志打印
                .call()
                .chatResponse();
        return chatResponse.getResult().getOutput().getText();// 返回与大模型的对话的内容
    }
}
- 创建controller
import com.qianliuliang.love.chat.SimpleChat;
import org.springframework.beans.factory.annotation.Autowired;
import org.springframework.web.bind.annotation.PostMapping;
import org.springframework.web.bind.annotation.RequestMapping;
import org.springframework.web.bind.annotation.RestController;

@RestController
@RequestMapping("/chat")
public class ChatController {


    @Autowired
    private SimpleChat simpleChat;

    /**
     * 普通文本会话
     *
     * @param msg
     * @param chatId
     * @return
     */
    @PostMapping("/doChatWithString")
    public String doChatWithString( String msg, String chatId) {
        return simpleChat.doChatWithString(msg, chatId);
    }
}
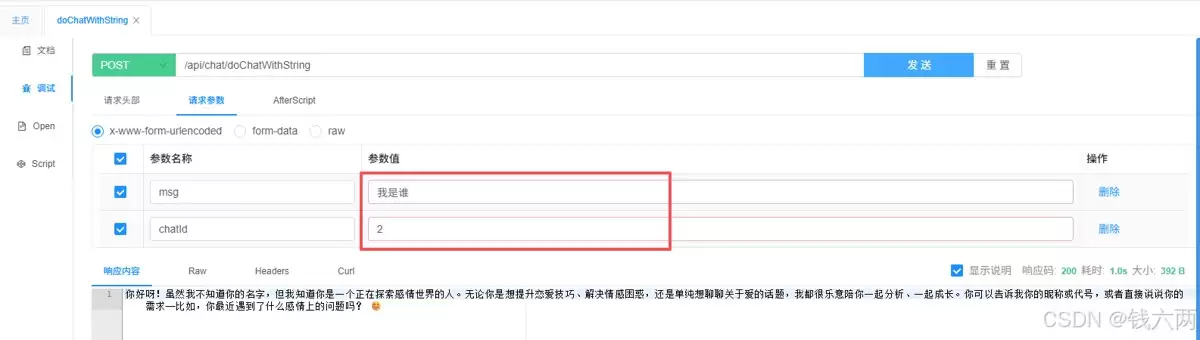
- 重启项目,测试
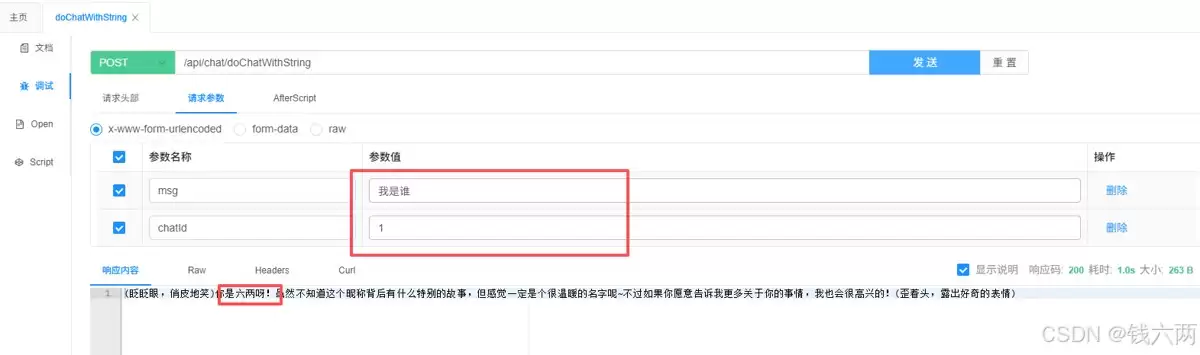
在会话ID为1的会话中(聊天室1),告诉大模型"我是六两"
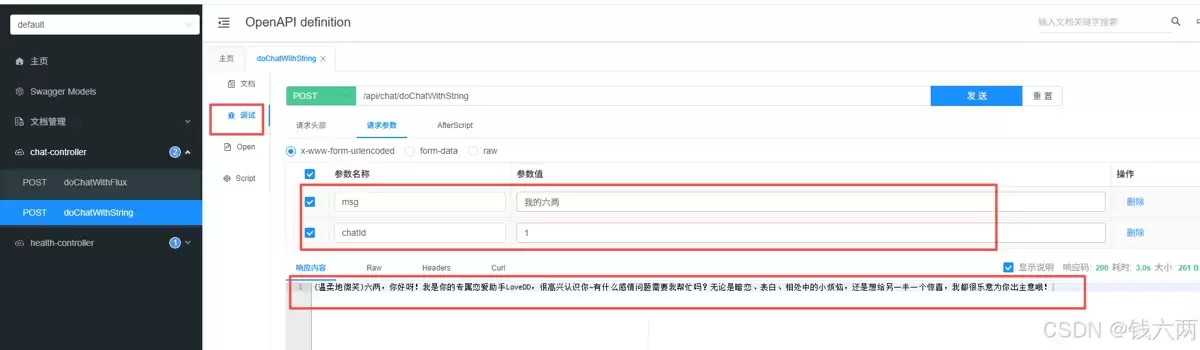
在会话ID为2的会话中(聊天室2),问大模型"我是谁",此时大模型不知道我是谁,因为在不同的聊天室
在会话ID为1的会话中(回到聊天室1),问大模型"我是谁",此时大模型知道我是六两“”,因为在聊天室1中我告诉过大模型“我是六两”【此时大模型有记忆】
好了,到这里就结束了。
以上就是在SpringBoot项目中接入DeepSeek大模型的完整流程的详细内容,更多关于SpringBoot接入DeepSeek大模型的资料请关注本站其它相关文章!
您可能感兴趣的文章:- 基于SpringBoot+Vue实现DeepSeek对话效果的详细步骤
- springboot整合阿里云百炼DeepSeek实现sse流式打印的操作方法
- SpringBoot整合DeepSeek技术指南(实际应用场景)
- SpringBoot配置Ollama实现本地部署DeepSeek
- springboot集成Deepseek4j的项目实践
相关文章
- C#代码实现方式根据模板快速生成Word文档实用指南 09-08
- 时尚百货城上火了该喝什么去去火—上火答题答案 09-08
- c语言程序设计课后题解析怎么做 09-08
- c语言求最大公约数怎么求 09-08
- C语言软件密钥是什么意思 09-08
- 蓝色星原旅谣种菜机制玩法操作步骤 蓝色星原旅谣种菜机制分享 09-08