


最新下载
热门教程
- 1
- 2
- 3
- 4
- 5
- 6
- 7
- 8
- 9
- 10
html5 拖拽及用 js 实现拖拽功能的示例代码
时间:2025-07-15 12:00:02 编辑:袖梨 来源:一聚教程网
1. HTML5 拖拽
1.1 相关知识
拖拽元素:可以为元素添加 draggable="true"来让元素能够被拖拽。
拖拽元素的事件监听:(应用于拖拽元素)
ondragstart当拖拽开始时调用 ondragleave 当鼠标离开拖拽元素时调用 ondragend 当拖拽结束时调用 ondrag 整个拖拽过程都会调用目标元素:把元素A拖拽到元素B里,那么元素B就是目标元素。页面中任何一个元素都可以成为目标元素。
目标元素的事件监听:(应用于目标元素)
ondragenter 当拖拽元素进入时调用 ondragover 当拖拽元素停留在目标元素上时,就会连续一直触发(不管拖拽元素此时是移动还是不动的状态) ondrop 当在目标元素上松开鼠标时调用 ondragleave 当鼠标离开目标元素时调用如果想让拖拽元素在目标元素里做点事情,就必须要在 ondragover() 里加event.preventDefault()这一行代码。
1.2 拖拽基础
<!DOCTYPE html><html lang="en"> <head> <meta charset="UTF-8" /> <meta name="viewport" content="width=device-width, initial-scale=1.0" /> <title>Document</title> <style> .box { width: 200px; height: 200px; background: green; } .box2 { position: relative; left: 300px; top: 50px; width: 300px; height: 300px; background: red; } </style> </head> <body> <div class="box" draggable="true"></div> <div class="box2"></div> <script> // HTML5 拖拽 // 应用于拖拽元素 var box = document.querySelector('.box') box.ondragstart = function () { console.log('拖拽开始') } box.ondragleave = function () { console.log('鼠标离开元素') } box.ondragend = function () { console.log('拖拽结束') } // box.ondrag = function () { // console.log('在拖拽'); // } // 应用于目标元素(想把 box 拖拽进去的地方) var box2 = document.querySelector('.box2') box2.ondragenter = function () { console.log('进来了') } box2.ondragleave = function () { console.log('离开了') } // 当拖拽元素在 目标元素上时,连续触发 box2.ondragover = function (e) { // 如果想让拖拽元素在目标元素里做点事情,就必须要在 ondragover() 里加event.preventDefault()这一行代码。 e.preventDefault() console.log('over') } box2.ondrop = function () { console.log('松开鼠标了') } </script> </body></html>1.3 将 A 在 B、C 之间拖拽
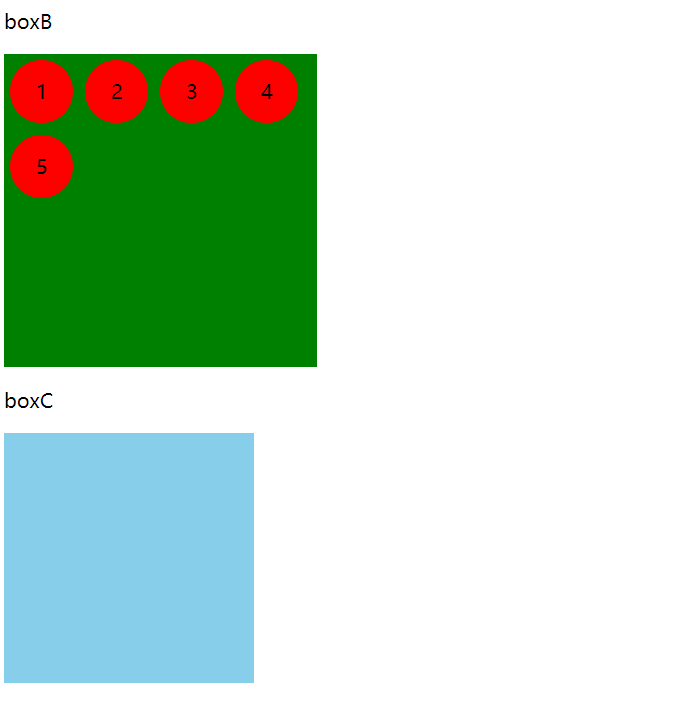
<!DOCTYPE html><html lang="en"> <head> <meta charset="UTF-8" /> <meta name="viewport" content="width=device-width, initial-scale=1.0" /> <title>Document</title> <style> .box-b { width: 250px; height: 250px; background: green; } .cell-a { float: left; width: 50px; height: 50px; margin: 5px; text-align: center; line-height: 50px; border-radius: 50%; background: red; } .box-c { width: 200px; height: 200px; margin-top: 10px; background: skyblue; } </style> </head> <body> <p>boxB</p> <div class="box-b"> <div class="cell-a" draggable="true">1</div> <div class="cell-a" draggable="true">2</div> <div class="cell-a" draggable="true">3</div> <div class="cell-a" draggable="true">4</div> <div class="cell-a" draggable="true">5</div> </div> <p>boxC</p> <div class="box-c"></div> <script> var cellA = document.querySelectorAll('.cell-a') var boxB = document.querySelector('.box-b') var boxC = document.querySelector('.box-c') var temp = null cellA.forEach((cell, index) => { // 从 boxB 拖拽到 boxC cell.ondragstart = function () { // 保持当前拖拽的元素 temp = this } cell.ondragend = function () { temp = null } boxC.ondragover = function (e) { e.preventDefault() } boxC.ondragenter = function () { this.appendChild(temp) } // 从 boxC 拖拽到 boxB boxB.ondragover = function (e) { e.preventDefault() } boxB.ondragenter = function () { this.appendChild(temp) } }) </script> </body></html>效果展示
2. 用 js 实现拖拽
2.1 js 简单拖拽
按下鼠标进行简单的拖拽。
<!DOCTYPE html><html lang="en"> <head> <meta charset="UTF-8" /> <meta name="viewport" content="width=device-width, initial-scale=1.0" /> <title>Document</title> <style> #box { position: absolute; width: 200px; height: 200px; background: green; } </style> <script> window.onload = function () { var box = document.getElementById('box') var disX = 0 var disY = 0 box.onmousedown = function (e) { var e = e || window.event disX = e.clientX - this.offsetLeft disY = e.clientY - this.offsetTop box.onmousemove = function (e) { var e = e || window.event box.style.left = e.clientX - disX + 'px' box.style.top = e.clientY - disY + 'px' } box.onmouseup = function (e) { console.log('end') this.onmousemove = null } return false } } </script> </head> <body> <div id="box"></div> </body></html>效果展示

2.2 带效果的拖拽
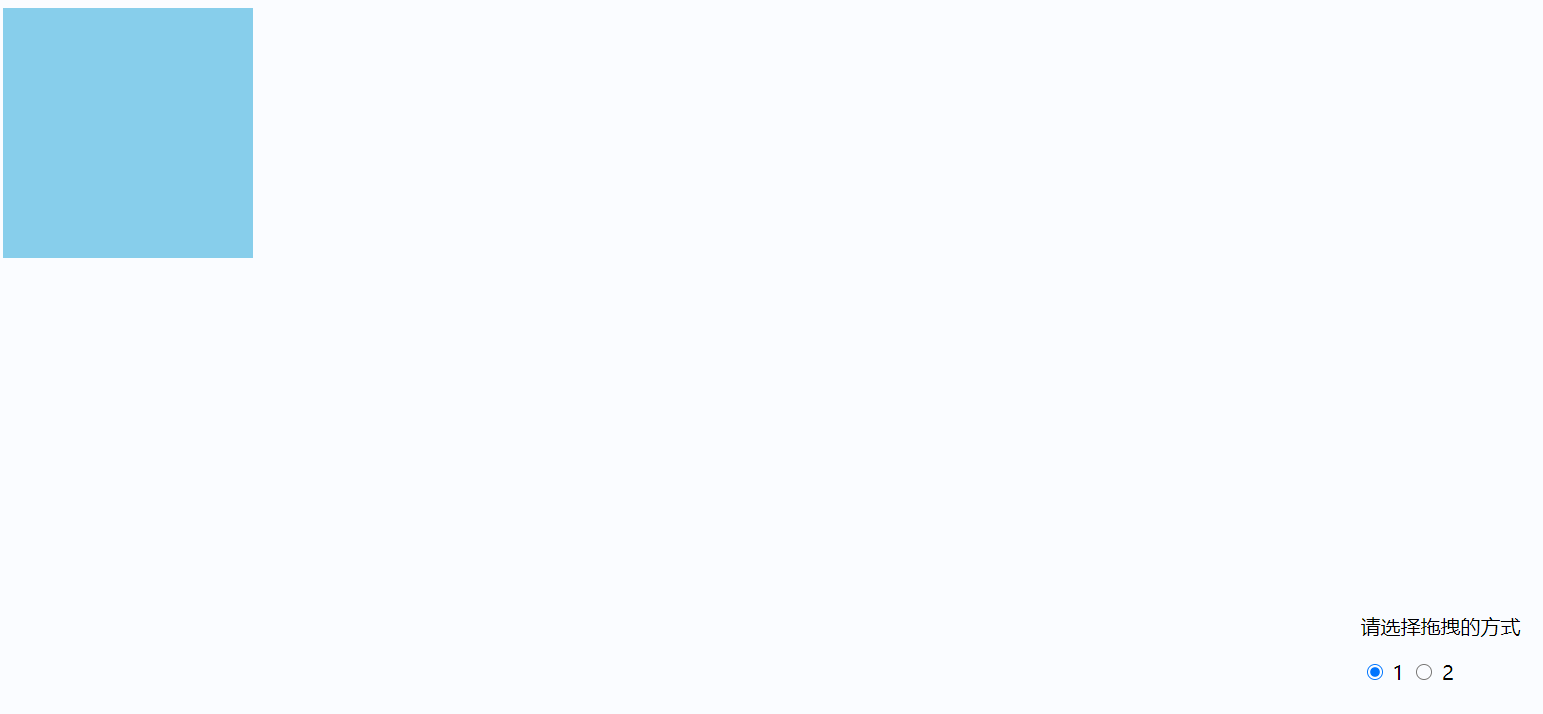
<!DOCTYPE html><html lang="en"> <head> <meta charset="UTF-8" /> <meta name="viewport" content="width=device-width, initial-scale=1.0" /> <title>Document</title> <style> .box { position: absolute; width: 200px; height: 200px; background: skyblue; } .box1 { position: absolute; border: 1px dashed black; opacity: 0.5; } .way-box { position: absolute; bottom: 30px; right: 30px; /* 无法选中 */ -moz-user-select: none; /* 火狐 */ -webkit-user-select: none; /* 谷歌 */ -ms-user-select: none; /* IE */ user-select: none; } </style> <script> window.onload = function () { ;(function () { var box = document.querySelector('.box') var disX, disY, temp var body = document.querySelector('body') var way1 = document.querySelector('#way1') var way2 = document.querySelector('#way2') box.onmousedown = function (e) { var e = e || window.event // 兼容性写法 disX = e.clientX - this.offsetLeft disY = e.clientY - this.offsetTop temp = document.createElement('div') body.appendChild(temp) temp.classList.add('box') temp.classList.add('box1') // 移动后位置会变,temp 的位置应该与 box 位置重合 temp.style.left = e.clientX - disX + 'px' // 记得加单位! temp.style.top = e.clientY - disY + 'px' temp.onmousemove = function (e) { var e = e || window.event temp.style.left = e.clientX - disX + 'px' // 记得加单位! temp.style.top = e.clientY - disY + 'px' } temp.onmouseup = function (e) { console.log('end') this.onmousemove = null // 1 则默认不发生实际移动 if (way2.checked) { box.style.left = e.clientX - disX + 'px' box.style.top = e.clientY - disY + 'px' } temp.style.display = 'none' this.onmouseup = null } } })() } </script> </head> <body> <div class="box"></div> <div class="way-box"> <p>请选择拖拽的方式</p> <input type="radio" id="way1" name="way" checked /> <label for="way1">1</label> <input type="radio" id="way2" name="way" /> <label for="way2">2</label> </div> </body></html>效果展示
有时会卡顿,未解决...
到此这篇关于html5 拖拽及用 js 实现拖拽的文章就介绍到这了,更多相关html5 拖拽内容请搜索一聚教程网以前的文章或继续浏览下面的相关文章,希望大家以后多多支持一聚教程网!
相关文章
- 检疫区最后一站结膜炎与红眼区别一览 07-21
- 超大杯研究员的异常求汁欲第二章流程及单词出处 07-21
- 斗罗大陆诛邪传说什么时候上线 07-21
- 原神八重神子选精通沙还是攻击沙好 07-21
- 我不是盐神网站入口在哪 07-21
- 冒险者旅馆2全流程通关攻略是什么 07-21