


最新下载
热门教程
- 1
- 2
- 3
- 4
- 5
- 6
- 7
- 8
- 9
- 10
java实现Linux中docker容器下命令交互代码示例
时间:2022-06-29 02:27:38 编辑:袖梨 来源:一聚教程网
本篇文章小编给大家分享一下java实现Linux中docker容器下命令交互代码示例,文章代码介绍的很详细,小编觉得挺不错的,现在分享给大家供大家参考,有需要的小伙伴们可以来看看。
开发需求: 因系统程序部署时,经常是拆分部署(多台机器) ,手工部署费时费力,且每次都要手工配置系统参数(系统提供配置向导)。
如下图所示:
1)进行main容器 -> 2)执行系统配置向导 -> 3)选择服务器模式 -> 4) 选择web控制台....然后进行具体的服务器IP设置。
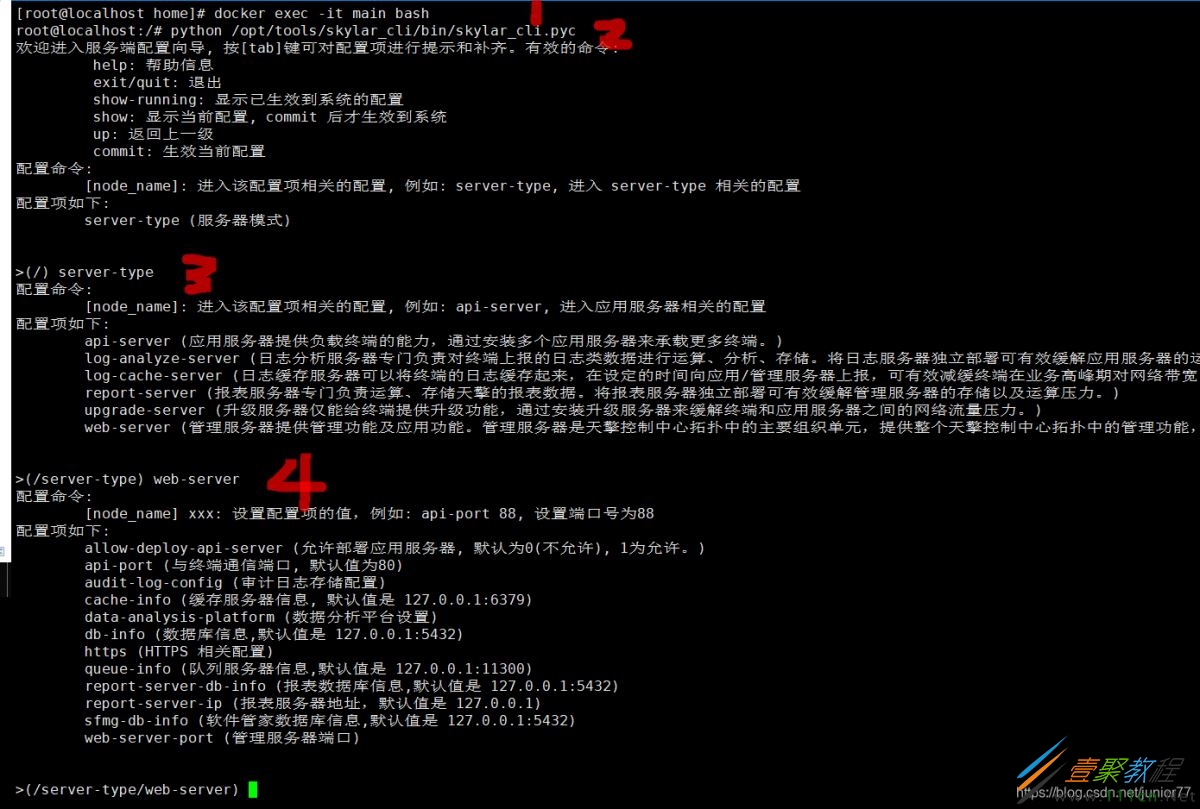
为了解放双手,用java实现了Linux(centos) 下docker 应用程序的命令交互。
具体代码如下:
import java.io.*;

/**
 * @author by dujiajun
 * @date 2021/4/29.
 */
public class TestMain extends Thread{

    //进入docker main
    private static String [] cmds = {"docker","exec","-i","main","bash"};
    private Process pro;

    //初始化各机器IP信息
    private String role = "";
    private String webIp = "";
    private String redisIp = "";
    private String beanstalkdIp = "";
    private String pgIp = "";


    //main应用重启
    public static String [] cmdRestart = {"/bin/sh","-c","docker restart main"};

    public void cmdRun(String[] machines) throws Exception {
        //执行xx系统配置向导命令并生成进程
        //pro = Runtime.getRuntime().exec(cmds);
        ProcessBuilder pb = new ProcessBuilder(cmds);
       /* pb.inheritIO();
        pb.redirectErrorStream(true);*/
        pro = pb.start();
        System.out.println("执行前pro1:" + pro.isAlive());

        //解析machines信息
        if (machines.length > 0) {
            for (int i = 0; i < machines.length; i++) {
                int strEndIndex = machines[i].indexOf(":");
                String str = machines[i].substring(0, strEndIndex);
                String content = machines[i].substring(strEndIndex + 1);
                switch (str.trim()) {
                    case "role":
                        role = content;
                        break; //web服务器IP
                    case "webIp":
                        webIp = content;
                        break;  //redis服务器IP
                    case "redisIp":
                        redisIp = content;
                        break;  //redis服务器IP
                    case "beanstalkdIp":
                        beanstalkdIp = content;
                        break; //beanstalkd服务器IP
                    case "pgIp":
                        pgIp = content;
                        break; //beanstalkd服务器IP
                    default:
                        break;
                }
            }
        }

        new Thread() {
            public void run() {
                try (BufferedWriter bw = new BufferedWriter(new OutputStreamWriter(pro.getOutputStream()))) {
                    if (role != null && role.equals("web-server")) {//系统web控制台
                        System.out.println("*********进入web控制台配置向导*********");
                        //系统配置向导命令集-web
                        String[] strCmdWeb = {
                                "python /opt/tools/skylar_cli/bin/skylar_cli.pyc",//系统配置向导
                                "server-type", //服务器模式
                                "web-server", //管理服务器:提供管理功能及应用功能
                                "allow-deploy-api-server 0", //设置是否允许部署应用服务器 1允许 0不允许
                                "cache-info " + redisIp + ":6379", //缓存服务器
                                "db-info " + pgIp + ":5432", //设置数据库信息
                                "queue-info " + beanstalkdIp + ":11300", //设置队列信息
                                "report-server-db-info " + pgIp + ":5432", //设置报表数据库
                                "sfmg-db-info " + pgIp + ":5432", //设置软件管家数据库
                                "web-server-port " + webIp + ":8080",//设置管理服务器端口
                                "commit",//提交
                                "exit"
                        };

                        //查看进程是否还存活
                        System.out.println("执行前pro2:" + pro.isAlive());
                        for (String strWeb : strCmdWeb) {
                            synchronized (bw) {
                                bw.write(strWeb.trim());
                                bw.newLine();
                                System.out.println("step: " + strWeb);
                                bw.wait(1000);
                            }
                        }

                        //查看进程是否还存活
                        System.out.println("pro3:" + pro.isAlive());
                        bw.flush();//缓存提交
                        System.out.println("缓存提交!");
                        bw.close();
                        System.out.println(" bw.close();");
                        System.out.println("web配置向导设置成功!");

                    } else if (role != null && role.equals("api-server")) {//系统app应用
                        //系统配置向导命令集-APP
                        System.out.println("*********进入APP服务器控制台配置向导*********");
                        String[] strCmdApp = {
                                "python /opt/tools/skylar_cli/bin/skylar_cli.pyc",//系统配置向导
                                "server-type", //服务器模式
                                "api-server", //APP服务器
                                "cache-info " + redisIp + ":6379", //缓存服务器
                                "db-info " + pgIp + ":5432", //设置数据库信息
                                "queue-info " + beanstalkdIp + ":11300", //设置队列信息
                                "web-server-info " + webIp + ":8080", //设置管理服务器端口
                                "commit",//提交配置
                                "exit"
                        };

                        for (String str : strCmdApp) {
                            synchronized (bw) {
                                bw.write(str.trim());
                                bw.newLine();
                                System.out.println("step: " + str);
                                bw.wait(1000);
                            }
                        }
                        //查看进程是否还存活
                        System.out.println("pro3:" + pro.isAlive());
                        bw.flush();//缓存提交
                        System.out.println("缓存提交!");
                        System.out.println("app配置向导设置成功!");
                        bw.close();

                    } else if (role != null && role.equals("log-analyze-server")) {//系统日志分析服务器
                        //系统配置向导命令集-log-analyze-server
                        System.out.println("*********进入日志分析服务器控制台配置向导*********");
                        String[] strCmdLog = {
                                "python /opt/tools/skylar_cli/bin/skylar_cli.pyc",//天擎配置向导
                                "server-type", //服务器模式
                                "log-analyze-server", //管理服务器:提供管理功能及应用功能
                                "cache-info " + redisIp + ":6379", //缓存服务器
                                "db-info " + pgIp + ":5432", //设置数据库信息
                                "queue-info " + beanstalkdIp + ":11300", //设置队列信息
                                "web-server-info " + webIp + ":8080", //设置管理服务器端口
                                "sfmg-db-info " + pgIp + ":5432", //设置软件管家数据库
                                "commit",//提交配置
                                "exit"

                        };

                        //顺序执行配置向导命令
                        for (String str : strCmdLog) {
                            synchronized (bw) {
                                bw.write(str.trim());
                                bw.newLine();
                                System.out.println("step: " + str);
                                bw.wait(1000);
                            }
                        }
                        //测试进程是否还存活
                        System.out.println("pro3:" + pro.isAlive());
                        bw.flush();//缓存提交
                        System.out.println("缓存提交!");
                        System.out.println("日志分析服务器配置向导设置成功!");
                        bw.close();
                    }

                } catch (IOException | InterruptedException e) {
                    //pro.destroyForcibly();
                    e.printStackTrace();
                    //pro.destroy();
                    System.out.println("e.getMessage(): " + e.getMessage());
                } finally {
                    try {
                        Process process = Runtime.getRuntime().exec(cmdRestart);//重启main
                        System.out.println("process.isAlive:" + process.isAlive());
                        System.out.println("重启main成功!");
                    } catch (IOException e) {
                        e.printStackTrace();
                    }
                }
            }
        }.start();


        new Thread(){
            public void run(){
                BufferedReader br = new BufferedReader(new InputStreamReader(pro.getErrorStream()));
                String cmdout = "";
                try {
                    cmdout = br.readLine();
                    while(cmdout!= null&&(!cmdout.equals("exit"))){
                        System.out.println(cmdout);
                    }
                } catch (IOException e) {
                    //System.out.println("br:pro.destroy();");
                    //pro.destroy();
                    e.printStackTrace();
                    System.out.println("e.printStackTrace();");
                }
                try {
                    System.out.println(" br.close();");
                    br.close();
                } catch (IOException e) {
                    e.printStackTrace();
                }
            }
        }.start();
        pro.waitFor();//进程等待
    }

    public static void main(String[] args) throws Exception {

        TestMain testMain = new TestMain();

        /*
        //测试用
        String[] machines ={
                "role:web-server",
                "webIp:xx.xx.xx.110",
                "redisIp:xx.xx.xx.211",
                "beanstalkdIp:xx.xx.xx.211",
                "pgIp:xx.xx.xx.212"
        };*/

        testMain.cmdRun(args);
       /* System.exit(0);
        System.out.println("System.exit(0);");*/
    }
}
特别注意:
private static String [] cmds = {"docker","exec","-i","main","bash"};
一定要使用 docker exec-imain bash ,不要使用 -it ,否则会报错 cannot enable tty mode on non tty input。
Usage: docker exec [OPTIONS] CONTAINER COMMAND [ARG...]

Run a command in a running container

  -i, --interactive=false    Keep STDIN open even if not attached
  -t, --tty=false            Allocate a pseudo-TTY
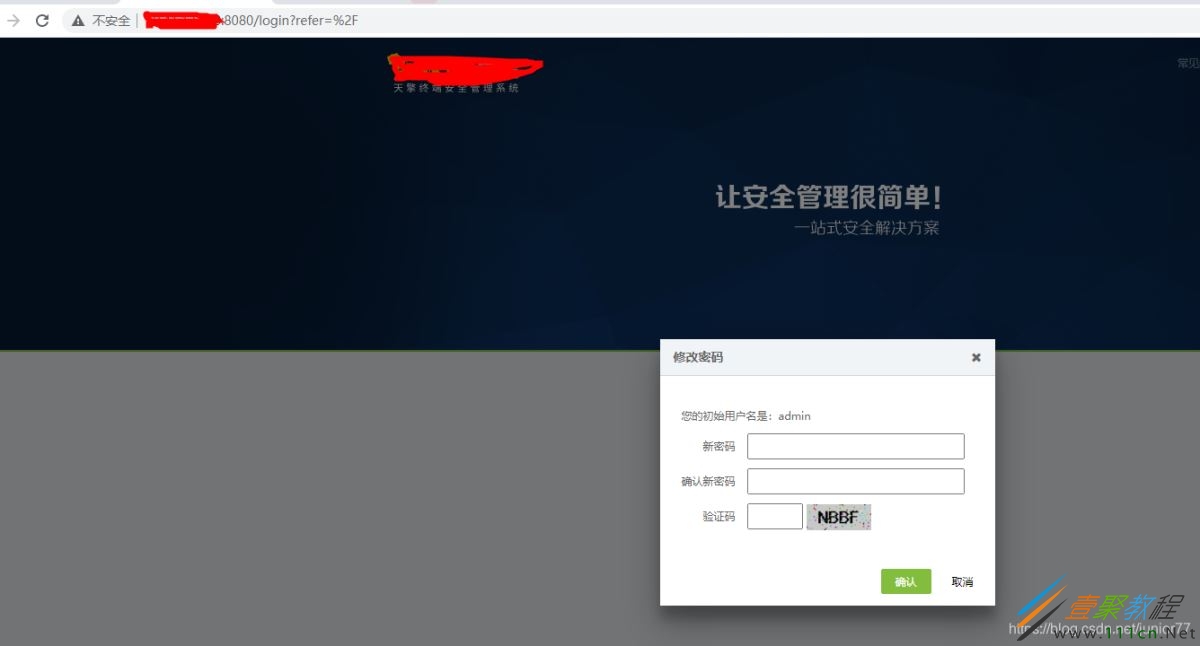
打成jar包,执行jar包:
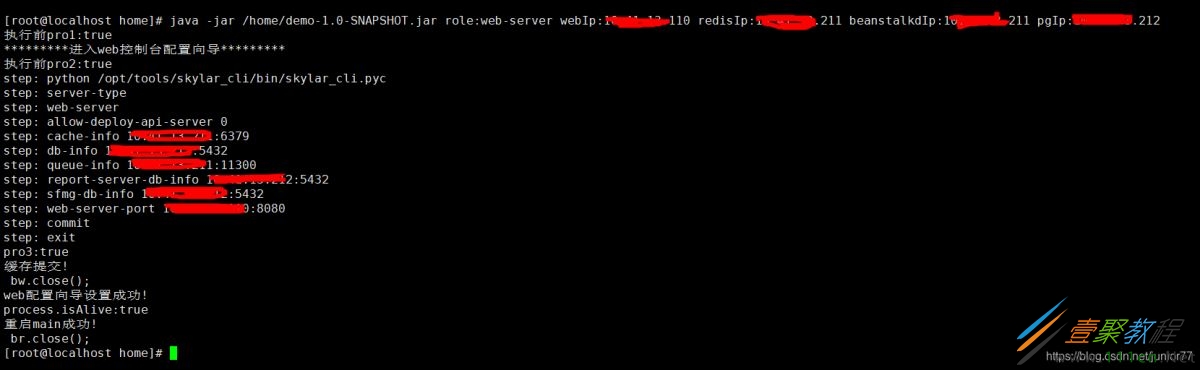
终于看到久违的部署成功界面~
相关文章
- 恋与深空五星自选池心像标定 蓝券特别许愿池机制是什么 07-27
- 无限暖暖若生命如诗新版本 2.1活动传送点和逸事攻略 07-27
- 原神月之四新版本角色攻略 哥伦比娅天赋是什么详解 07-27
- 鹅鸭杀隐藏时装怎么获得 隐藏时装与隐藏表情获得方法介绍 07-27
- 龙族卡塞尔之门康斯坦丁技能是什么 康斯坦丁技能详细介绍 07-27
- 生存33天冰魔法师怎么打 冰魔法师打法教学详解 07-27