


最新下载

热门教程
- 1
- 2
- 3
- 4
- 5
- 6
- 7
- 8
- 9
- 10
linux中安装RHEV-M的教程详解
时间:2022-11-14 22:07:17 编辑:袖梨 来源:一聚教程网
一、yum源配置
安装rhev-m需要配置RHEV-M、RHEV-H、Supplementary、JBoss四个源,这个实验的时候,我将其整合到了一个配置中。并将其保存到/etc/yum.repos.d/目录下。如下:
[root@rhevm ~]# wget http://classroom.example.com/materials/rhevm.repo -P /etc/yum.repos.d/
# cat /etc/yum.repos.d/rhevm.repo
[RHEVMgr]
name=Red Hat Enterprise Virtualization Manager for RHEL 6
baseurl=http://content.example.com/rhev3.5/x86_64/dvd/rhel-6-server-rhevm-3.5-rpms/
enabled=1
gpgcheck=0
[RHEVHyp6]
name=Red Hat Enterprise Virtualization Hypervisor for RHEL 6
baseurl=http://content.example.com/rhev3.5/x86_64/dvd/rhel-6-server-rhevh-rpms/
enabled=1
gpgcheck=0
[RHEVHyp7]
name=Red Hat Enterprise Virtualization Hypervisor for RHEL 7
baseurl=http://content.example.com/rhev3.5/x86_64/dvd/rhel-7-server-rhevh-rpms/
enabled=1
gpgcheck=0
[RHELSupp]
name=Red Hat Enterprise Linux Server 6 Supplementary
baseurl=http://content.example.com/rhel6.6/x86_64/Supplementary
enabled=1
gpgcheck=0
[RHEVJBoss]
name=Red Hat Enterprise Virtualization JBoss EAP 6.2
baseurl=http://content.example.com/rhev3.5/x86_64/dvd/jb-eap-6-for-rhel-6-server-rpms/
enabled=1
gpgcheck=0
升级当前的软件包
[root@rhevm ~]# yum update -y
二、rhev-m软件包安装及配置
1、安装相关包
[root@rhevm ~]# yum -y install rhevm rhevm-dwh rhevm-reports
其中后面两个包是rhevm报表页面使用的相关包。
2、使用engine-setup命令配置rhevm
这里使用--generate-answer生成自动应答文件,该文件的作用是一旦rhevm主机出现问题,可以通过该文件进行快速安装。
[root@rhevm ~]# engine-setup --help
Usage: /usr/bin/engine-setup
--log=file
write log to this file.
--config=file
Load configuration files.
--config-append=file
Load extra configuration files or answer file.
--offline
Offline mode.
--generate-answer=file
Generate answer file.
--jboss-home=dir
Use this jboss.
[root@rhevm ~]# engine-setup --generate-answer=answer.txt
[ INFO ] Stage: Initializing
[ INFO ] Stage: Environment setup
--== PRODUCT OPTIONS ==--
Configure Engine on this host (Yes, No) [Yes]: //回车
Configure Data Warehouse on this host (Yes, No) [Yes]: //回车
Configure Reports on this host (Yes, No) [Yes]://回车
Configure WebSocket Proxy on this host (Yes, No) [Yes]: //回车
Do you want Setup to configure the firewall? (Yes, No) [Yes]: no
Host fully qualified DNS name of this server [rhevm.pod0.example.com]: //回车
--== DATABASE CONFIGURATION ==--
Where is the Reports database located? (Local, Remote) [Local]:
Setup can configure the local postgresql server automatically for the Reports to run. This may conflict with existing applications.
Would you like Setup to automatically configure postgresql and create Reports database, or prefer to perform that manually? (Automatic, Manual) [Automatic]:
Where is the DWH database located? (Local, Remote) [Local]:
Setup can configure the local postgresql server automatically for the DWH to run. This may conflict with existing applications.
Would you like Setup to automatically configure postgresql and create DWH database, or prefer to perform that manually? (Automatic, Manual) [Automatic]:
Where is the Engine database located? (Local, Remote) [Local]:
Setup can configure the local postgresql server automatically for the engine to run. This may conflict with existing applications.
Would you like Setup to automatically configure postgresql and create Engine database, or prefer to perform that manually? (Automatic, Manual) [Automatic]:
--== OVIRT ENGINE CONFIGURATION ==--
Engine admin password: //我这里使用的密码为redhat,所以这里提示为弱口令。后面还有report密码配置。
Confirm engine admin password:
[WARNING] Password is weak: it is based on a dictionary word
Use weak password? (Yes, No) [No]: yes
Application mode (Virt, Gluster, Both) [Both]:
………………省略
--== SYSTEM CONFIGURATION ==--
Configure an NFS share on this server to be used as an ISO Domain? (Yes, No) [Yes]: //ISO域配置,这里使用rhevm本机作为ISO域
Local ISO domain path [/var/lib/exports/iso]: /exports/rhevisos
Local ISO domain ACL - note that the default will restrict access to rhevm.pod0.example.com only, for security reasons [rhevm.pod0.example.com(rw)]:
Local ISO domain name [ISO_DOMAIN]: iso0
//当上面的交互式完成后,会跳出配置确认信息,确认完成后,会进行安装。
http://rhevm.pod0.example.com:80/ovirt-engine //web管理界面地址
https://rhevm.pod0.example.com:443/ovirt-engine
Please use the user "admin" and password specified in order to login
The following network ports should be opened:
tcp:111
tcp:2049
tcp:32803
tcp:443
tcp:5432
tcp:6100
tcp:662
tcp:80
tcp:875
tcp:892
udp:111
udp:32769
udp:662
udp:7410
udp:875
udp:892
An example of the required configuration for iptables can be found at:
/etc/ovirt-engine/iptables.example
--== END OF SUMMARY ==--
[ INFO ] Starting engine service
[ INFO ] Restarting httpd
[ INFO ] Starting dwh service
[ INFO ] Starting reports service
[ INFO ] Generating answer file 'answer.txt'
[ INFO ] Stage: Pre-termination
[ INFO ] Stage: Termination
[ INFO ] Execution of setup completed successfully
answer.txt自动应答文件内容如下:
[root@rhevm ~]# cat answer.txt
# action=setup
[environment:default]
OVESETUP_DIALOG/confirmSettings=bool:True
OVESETUP_CONFIG/applicationMode=str:both
OVESETUP_CONFIG/remoteEngineSetupStyle=none:None
OVESETUP_CONFIG/adminPassword=str:redhat
OVESETUP_CONFIG/storageIsLocal=bool:False
OVESETUP_CONFIG/firewallManager=none:None
OVESETUP_CONFIG/remoteEngineHostRootPassword=none:None
OVESETUP_CONFIG/updateFirewall=bool:False
OVESETUP_CONFIG/remoteEngineHostSshPort=none:None
OVESETUP_CONFIG/fqdn=str:rhevm.pod0.example.com
OVESETUP_CONFIG/storageType=none:None
OSETUP_RPMDISTRO/requireRollback=none:None
OSETUP_RPMDISTRO/enableUpgrade=none:None
OVESETUP_DB/database=str:engine
OVESETUP_DB/fixDbViolations=none:None
OVESETUP_DB/secured=bool:False
OVESETUP_DB/host=str:localhost
OVESETUP_DB/user=str:engine
OVESETUP_DB/securedHostValidation=bool:False
OVESETUP_DB/port=int:5432
OVESETUP_ENGINE_CORE/enable=bool:True
OVESETUP_CORE/engineStop=none:None
OVESETUP_SYSTEM/memCheckEnabled=bool:True
OVESETUP_SYSTEM/nfsConfigEnabled=bool:True
OVESETUP_PKI/organization=str:pod0.example.com
OVESETUP_CONFIG/isoDomainMountPoint=str:/exports/rhevisos
OVESETUP_CONFIG/engineHeapMax=str:1024M
OVESETUP_CONFIG/isoDomainName=str:iso0
OVESETUP_CONFIG/isoDomainACL=str:rhevm.pod0.example.com(rw)
OVESETUP_CONFIG/engineHeapMin=str:1024M
OVESETUP_AIO/configure=none:None
OVESETUP_AIO/storageDomainName=none:None
OVESETUP_AIO/storageDomainDir=none:None
OVESETUP_PROVISIONING/postgresProvisioningEnabled=bool:True
OVESETUP_APACHE/configureRootRedirection=bool:True
OVESETUP_APACHE/configureSsl=bool:True
OVESETUP_DWH_CORE/enable=bool:True
OVESETUP_DWH_DB/database=str:ovirt_engine_history
OVESETUP_DWH_DB/secured=bool:False
OVESETUP_DWH_DB/host=str:localhost
OVESETUP_DWH_DB/disconnectExistingDwh=none:None
OVESETUP_DWH_DB/restoreBackupLate=bool:True
OVESETUP_DWH_DB/user=str:ovirt_engine_history
OVESETUP_DWH_DB/securedHostValidation=bool:False
OVESETUP_DWH_DB/performBackup=none:None
OVESETUP_DWH_DB/password=str:TFNnxG7K0VVjB5j8UAqCyv
OVESETUP_DWH_DB/port=int:5432
OVESETUP_DWH_PROVISIONING/postgresProvisioningEnabled=bool:True
OVESETUP_DB/password=str:PbyuIlmT5nj41REY2QCdJB
OVESETUP_REPORTS_CORE/enable=bool:True
OVESETUP_REPORTS_CONFIG/heapMin=str:1024M
OVESETUP_REPORTS_CONFIG/adminPassword=str:redhat
OVESETUP_REPORTS_CONFIG/heapMax=str:1024M
OVESETUP_REPORTS_DB/database=str:ovirt_engine_reports
OVESETUP_REPORTS_DB/secured=bool:False
OVESETUP_REPORTS_DB/host=str:localhost
OVESETUP_REPORTS_DB/user=str:ovirt_engine_reports
OVESETUP_REPORTS_DB/securedHostValidation=bool:False
OVESETUP_REPORTS_DB/password=str:mqJgjXh1N6VK781f4L3nhS
OVESETUP_REPORTS_DB/port=int:5432
OVESETUP_REPORTS_PROVISIONING/postgresProvisioningEnabled=bool:True
OVESETUP_ENGINE_CONFIG/fqdn=str:rhevm.pod0.example.com
OVESETUP_RHEVM_SUPPORT/redhatSupportProxyPort=none:None
OVESETUP_RHEVM_SUPPORT/redhatSupportProxy=none:None
OVESETUP_RHEVM_SUPPORT/redhatSupportProxyUser=none:None
OVESETUP_RHEVM_SUPPORT/configureRedhatSupportPlugin=bool:False
OVESETUP_RHEVM_SUPPORT/redhatSupportProxyPassword=none:None
OVESETUP_RHEVM_SUPPORT/redhatSupportProxyEnabled=bool:False
OVESETUP_RHEVM_DIALOG/confirmUpgrade=bool:True
OVESETUP_CONFIG/websocketProxyConfig=bool:True
3、查看默认iso域文件
[root@rhevm ~]# showmount -e localhost
Export list for localhost:
/exports/rhevisos *
[root@rhevm ~]# tree /exports/rhevisos/
/exports/rhevisos/
└── 8e63ca2a-b4ce-4506-a56c-aaede9fcccd2
├── dom_md
│ ├── ids
│ ├── inbox
│ ├── leases
│ ├── metadata
│ └── outbox
└── images
└── 11111111-1111-1111-1111-111111111111
├── rhev-tools-setup.iso
├── virtio-win_amd64.vfd
├── virtio-win.iso
└── virtio-win_x86.vfd
4 directories, 9 files
iso域images下的几个文件是为安装windows时使用,还需要注意的是/exports/rhevisos目录的属主和属组是vdsm:kvm,用户id和组id为36 。这些文件属如下两个包:
[root@rhevm ~]# rpm -qf /usr/share/rhev-guest-tools-iso/rhev-tools-setup.iso
rhev-guest-tools-iso-3.5-9.el6ev.noarch
[root@rhevm ~]# rpm -qf /usr/share/virtio-win/virtio-win.iso
virtio-win-1.7.2-2.el6.noarch
4、rhevm web登陆
安装配置完成后,rhevm web界面如下:
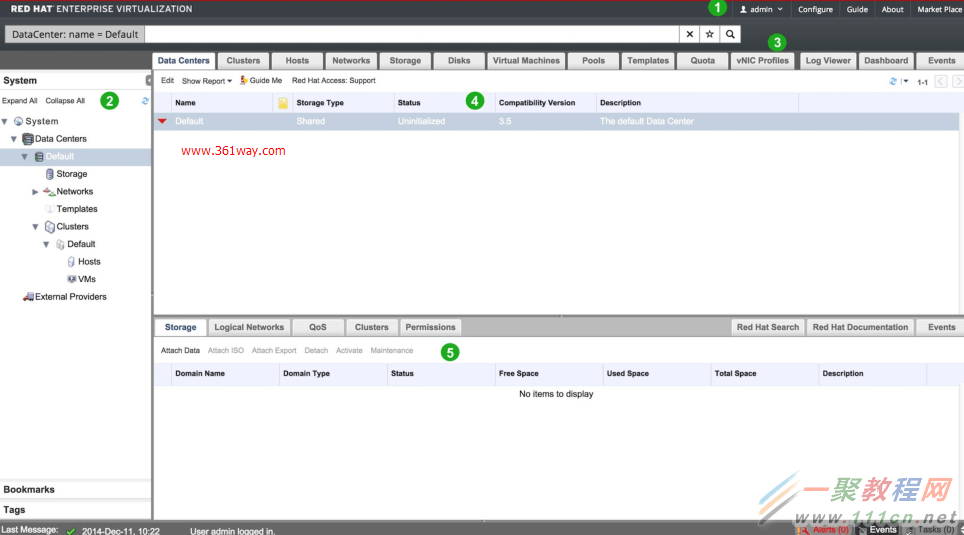
rhev3.5版本下的web界面是支持中文的,不过由于rh318的官方教材未提供中文版, 所认这里也选择英文界面。
三、rhev-m的个性化配置相关
1、检查版本升级
[root@rhevm ~]# engine-upgrade-check
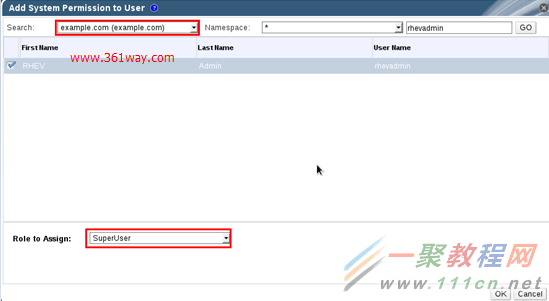
2、配置外部认证
这时使用外部IPA认证,配置完成后需要重启ovirt-engine服务
[root@rhevm ~]# engine-manage-domains add --domain=example.com --user=rhevadmin --provider=ipa
[root@rhevm ~]# engine-manage-domains list
Domain: example.com
User name: rhevadmin@EXAMPLE.COM
Manage Domains completed successfully
[root@rhevm ~]# /etc/init.d/ovirt-engine restart
使用内部的admin用户登陆后,点击右上角的Configure配置项,选择System Permissions并点击Add选项增加相应的用户,如下:
3、重置密码
可以通过engine-config命令重置内部认证的admin用户的密码,如下:
[root@rhevm ~]# engine-config -a|grep -i adminpassword //-a参数是查看所有配置项
LocalAdminPassword: Set version: general
AdminPassword: Set version: general
[root@rhevm ~]# engine-config -s AdminPassword=interactive //-s参数是设置相关选项的值
Please enter a password:
Please reenter password:
[root@rhevm ~]# /etc/init.d/ovirt-engine restart
Stopping oVirt Engine: [ OK ]
Starting oVirt Engine: [ OK ]
4、时间相关项设置
其中session选项是web界面多就不操作就自动操时,单位是分钟 。使用-a选择与-g选择都
[root@rhevm ~]# engine-config -a|grep -i session
UserSessionTimeOutInterval: 30 version: general
[root@rhevm ~]# engine-config -g UserSessionTimeOutInterval //使用-g选项时,后面的参数部分一定要使用全
UserSessionTimeOutInterval: 30 version: general
[root@rhevm ~]# engine-config -a|grep -i ServerReboot
ServerRebootTimeout: 300 version: general
ServerRebootTimeout时间是ovirt-engine服务重启后的操时时间。为安全考虑和避免等待过久时长,我们可以将session时间设置为2分钟,将ServerRebootTimeout时间设置为90秒:
[root@rhevm ~]# engine-config -s UserSessionTimeOutInterval=2
[root@rhevm ~]# engine-config -s ServerRebootTimeout=90
[root@rhevm ~]# /etc/init.d/ovirt-engine restart
5、日志收集
通过engine-log-collector命令可以收集群或数据中心的相关日志,便于问题分析(实际调用的也是sosreport指令)
engine-log-collector [options] list [all,clusters,datacenters]
engine-log-collector [options] collect
如下使用list查看相关信息时的情况:
[root@rhevm ~]# engine-log-collector list
This command will collect system configuration and diagnostic
information from this system.
The generated archive may contain data considered sensitive and its
content should be reviewed by the originating organization before
being passed to any third party.
No changes will be made to system configuration.
Please provide the REST API password for the admin@internal oVirt Engine user (CTRL+D to skip): //此处会让输入密码
Host list (datacenter=None, cluster=None, host=None):
Data Center | Cluster | Hostname/IP Address
center0 | cluster0 | 172.25.0.10
注:engine命令在进行REST API 调用时都需要输入密码,可以通过在/etc/ovirt-engine/目录下的相关配置文件中配置后,在执行相关命令时,则无需输入密码直接返回结果 。
四、rhev-m的卸载与重装
1、rhev-m 清理与卸载
# engine-cleanup
# yum remove rhevm* vdsm-bootstrap *jboss* postgresql-server
# echo "">/etc/exports
# service nfs restart
2、重装与恢复
重装时需要先yum安装相关软件包,再通过engine-config按照之间的answer.txt文件进行恢复之前的安装配置。安装完成后,使用postgresql-server数据库备份恢复---所有rhev-m 内的数据中心、集群、网络、主机、虚拟机、外部认证等都是存储在数据库中的。
# engine-setup --config-append=answer.txt
rhev-m在使用物理机时,最好需要两台之间做HA或把数据库单独做一台。当然rhev-m也可以是rhev-h内的一台虚拟机,在其中某台rhev-h物理机出现鼓掌时,可以通过rhev内部的HA机制漂移到其他主机上,继续提供服务。
相关文章
- 《辐射4》q键使用介绍 04-26
- 《辐射4》人物介绍 04-26
- 《下一站江湖2》风卷残云获得方法 04-26
- 《The Star Named EOS未晓星程》配置要求介绍 04-26
- 《辐射4》设置中文方法 04-26
- 《辐射4》88号避难所终端机一直初始化解决办法 04-26