


最新下载
热门教程
- 1
- 2
- 3
- 4
- 5
- 6
- 7
- 8
- 9
- 10
Xamarin.Forms支持UWP介绍用Xamarin.Forms构建UWP应用程序
时间:2022-11-14 22:49:46 编辑:袖梨 来源:一聚教程网
最新版本的Xamarin.Forms 正式开启了对 UWP 的支持.
要创建 UWP 项目, 必须是 VS2015, WIN8.1 下也可以, 但是只有 Windows 10 Mobile 的模拟器可用, Windows 10 的模拟器, 必须在 WIN 10 下.
以下简称
Xamarin.Forms 为 XF,
Caliburn.Micro 为 CM
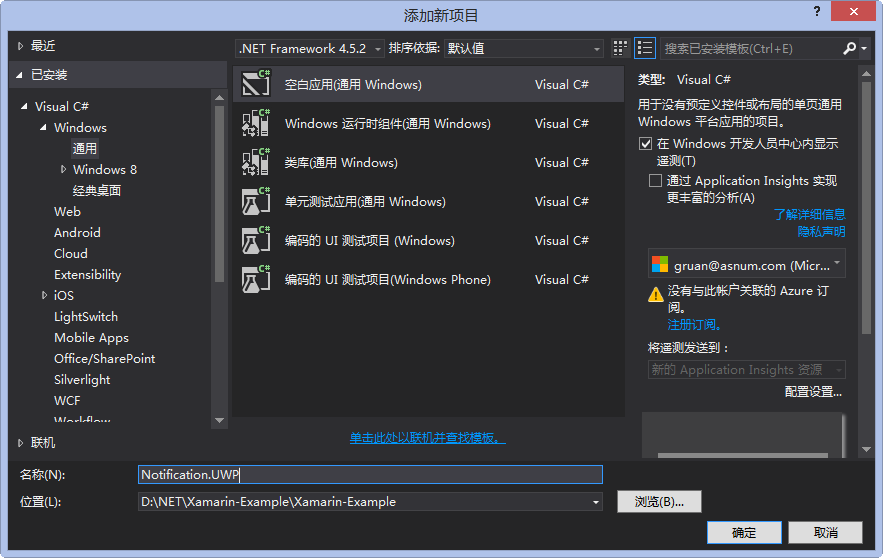
创建 XF支持的 UWP 项目
XF的项目模板, 当前没有加入 UWP , 需要手动创建 UWP 项目.
过程如下:
1, 添加一个 UWP 项目
2,添加 Xamarin.Forms 2.0.0.6482 的 Nuget 引用
3, 设置 UWP 项目的部署属性
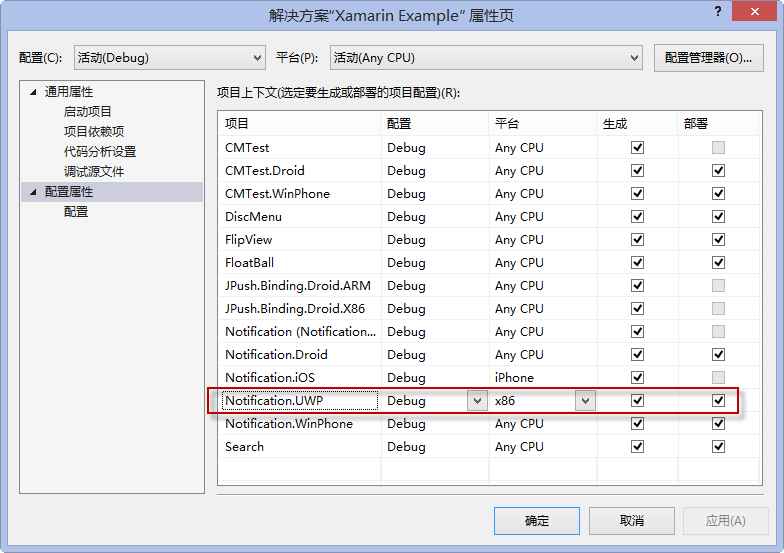
4, 将 XF PCL 或 Shared 项目引用到 UWP 项目中.
5, 编辑 UWP 项目的 App.xmal.cs , 在 OnLanched 方法中加入 (红色部分):
rootFrame.NavigationFailed += OnNavigationFailed;
Xamarin.Forms.Forms.Init (e);
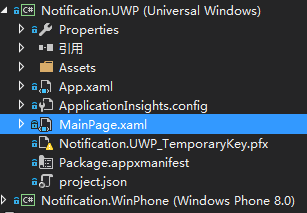
6, 修改 MainPage.xaml, 红色部分为变更
xmlns="http://schemas.micro**s*oft.com/winfx/2006/xaml/presentation"
xmlns:x="http://schemas.micr**osof*t.com/winfx/2006/xaml"
xmlns:local="using:Notification.UWP"
xmlns:d="http://schemas.m*icroso**ft.com/expression/blend/2008"
xmlns:mc="http://schemas.o*penxmlf*ormat*s.org/markup-compatibility/2006"
xmlns:forms="using:Xamarin.Forms.Platform.UWP"
mc:Ignorable="d">
7, 修改 MainPage.xaml.cs, 加入红色部分, Notification.App 是 XF 项目的 App
public sealed partial class MainPage {
public MainPage() {
this.InitializeComponent();
this.LoadApplication(new Notification.App());
}
}
OK, 一个 XF 支持的 UWP 就建好了.
添加 Caliburn.Micro 的支持
CM 3.0 版以经集成了对 XF 项目的支持, 具体可参考:
Xamarin 的 MVVM 之 Caliburn.Micro
CM 3.0 中也加入了对 UWP 的支持, 具体可参考示例:
https://gi*thub.c**om/Caliburn-Micro/Caliburn.Micro/tree/3.0.0/samples/Caliburn.Micro.HelloUWP/Caliburn.Micro.HelloUWP
这里要讲一下, 如何把 UWP / XF / CM 这三个东西加起来.
1, 修改 UWP 项目下的 App.xaml, 红色部分为变更部分
xmlns="http://schemas.micro**s*oft.com/winfx/2006/xaml/presentation"
xmlns:x="http://schemas.micr**osof*t.com/winfx/2006/xaml"
xmlns:local="using:Notification.UWP"
xmlns:cm="using:Caliburn.Micro"
RequestedTheme="Dark">
2, 修改 UWP 项目下的 App.xaml.cs , 红色部分为变更
public sealed partial class App {
private WinRTContainer _container;
private IEventAggregator _eventAggregator;
public App() {
InitializeComponent();
}
protected override void Configure() {
_container = new WinRTContainer();
_container.RegisterWinRTServices();
_eventAggregator = _container.GetInstance
}
protected override IEnumerable SelectAssemblies() {
return new[]
{
GetType().GetTypeInfo().Assembly,
typeof (Notification.App).GetTypeInfo().Assembly
};
}
protected override void OnLaunched(LaunchActivatedEventArgs args) {
Xamarin.Forms.Forms.Init(args); 29
this.DisplayRootView
if (args.PreviousExecutionState == ApplicationExecutionState.Terminated) {
//_eventAggregator.PublishOnUIThread(new ResumeStateMessage());
}
}
protected override void OnSuspending(object sender, SuspendingEventArgs e) {
//_eventAggregator.PublishOnUIThread(new SuspendStateMessage(e.SuspendingOperation));
}
protected override object GetInstance(Type service, string key) {
return _container.GetInstance(service, key);
}
protected override IEnumerable
A, 这个 App 只是一个 partial 的, 不在是从 Application 继承过来的.
B, OnLaunched 方法中 需要 Xamarin.Forms.Init
C, 然后 DisplayRootView MainPage, 这个 MainPage 不是按 CM 的 MVVM 处理的, 只是 XF 页面展示的一个容器.
D, 重写 SelectAssemblies 方法, 返回 UWP 项目的 Assembly 和 XF 项目的 Assembly .
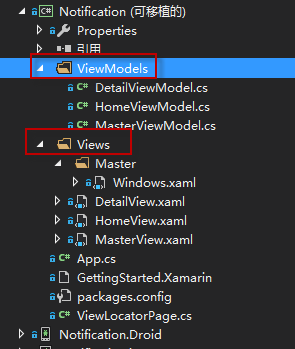
这里返回 XF 项目的 Assembly, 是因为 View / Model 在 XF 项目中定义, 如果不返回它 , 就无法和将 XF 中的 View 和 Model 关联起来.
3, 修改 MainPage.xaml.cs , 红色部分为变更
public MainPage() {
this.InitializeComponent();
this.LoadApplication(new Notification.App(IoC.Get()));
}
Notication.App 的构造函数接收一个 SimpleContainer 的参数, WinRTContainer 是 UWP 下的 SimpleContainer 的实现.
4, 看一下 Notification.App (XF PCL / Shared 项目) 的定义:
public class App : FormsApplication {
private SimpleContainer Container = null;
public App(SimpleContainer container) {
this.Container = container;
this.Container
.Singleton
.Singleton
this.DisplayRootView
}
protected override void PrepareViewFirst(NavigationPage navigationPage) {
this.Container.Instance
}
}
SimpleContainer 为 CM 自带的 IoC .
OK, 做完这一步, XF / UWP / CM 这三个东西就揉进一起了.
应用 Caliburn.Micro 的多视图功能
CM 支技多个 View 使用同一个 Model, 官方档只对这个功能只是用了一小段进行描述,
如何利用 CM 实现多视图切换
一直以来,都在大屏幕(相对于小屏的笔记本而言,21.5'')上做开发,写的东西搬到小屏幕上有点不适应。功能太密集,视图太紧凑,操作感不强。
如果针对小屏幕调整视图,那势必会影响大屏幕的体验。
Caliburn.Micro (简称CM) 有个功能:多个VIEW使用同一MODEL. 网上很少有相关文章对它进行描述,官方文档里有一小段对它进行描述,但只是一笔带过,在加上是英文的,看的似懂非懂。
上两张图,看一下效果:
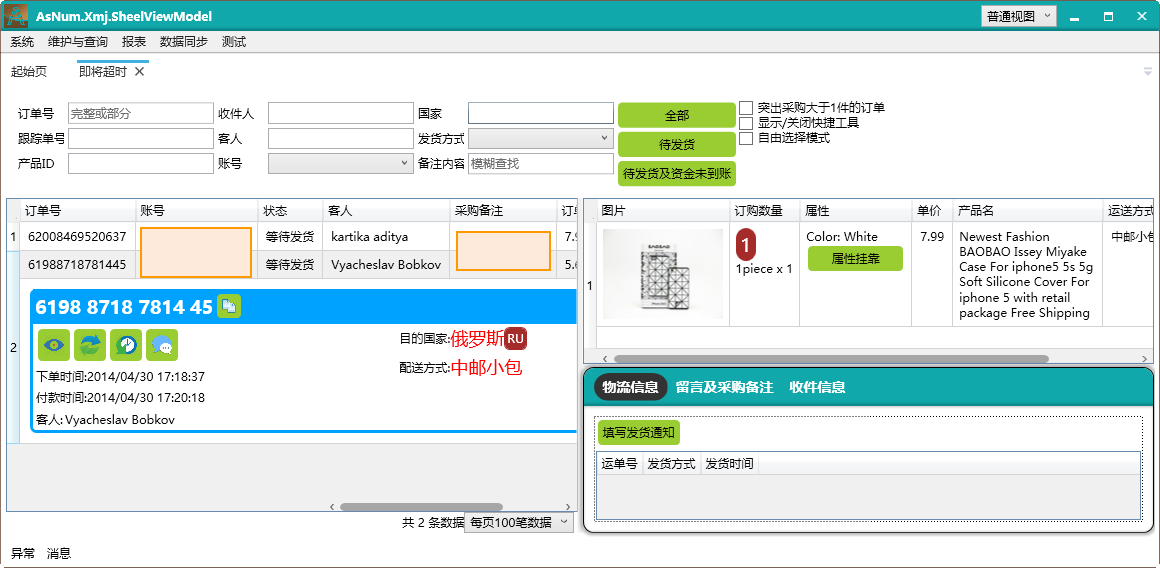
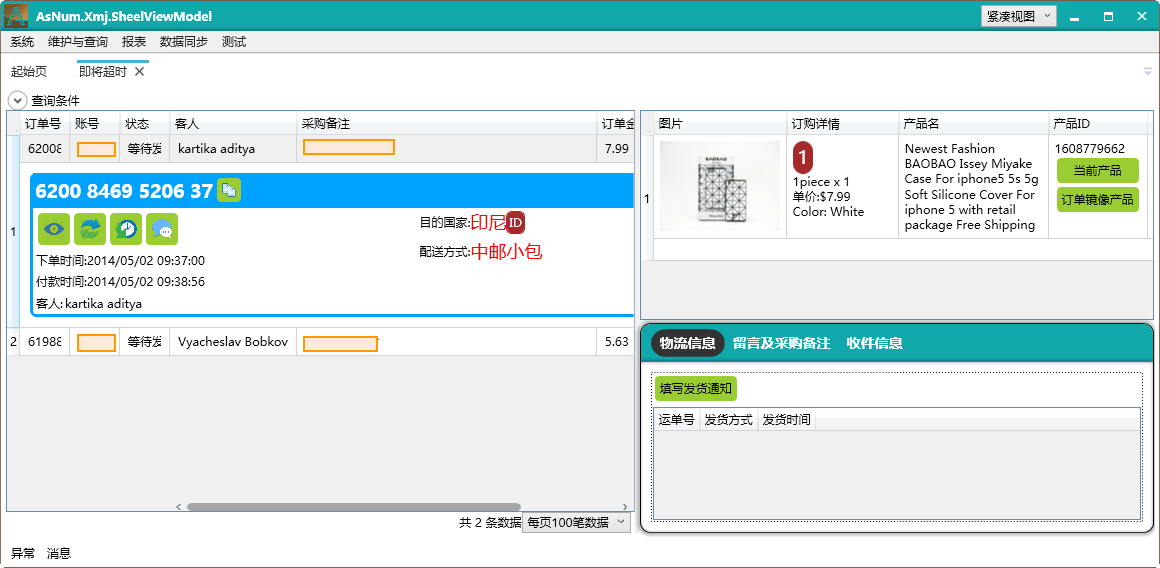
一个是普通视图,一个是紧凑视图。可能你会说,没什么差别啊?是的,因为我缩小了窗口,紧凑视图是针对 1280*800的分辨率做了简单优化了的。
切换视图的时候,不需要重新加载数据,因为这两个视图用的是同一个MODEL。
看一下视图的命名规则:
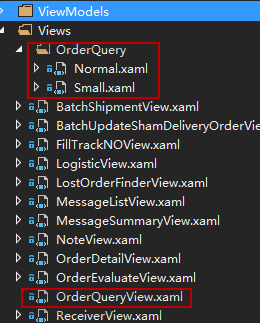
OrderQueryView -> OrderQuery 文件夹(命名空间)-> Normal, Small
原来OrderQueryView.xaml 的内容就是普通视图。现在改了:
只有这一段,其它的都挪到 Normal.xaml 和 Small.xaml 里了。至于怎么切换,都在 View.Context 上.
ViewContext 绑定到一个静态对象 的 静态属性 的 属性上。这样当这个属性的属性改变时,所有绑定在它上的视图都会跟着切换。
为了能绑定静态属性上(作用就是全局),而且还支持 INotifyPropertyChanged, 我绕了一个大圈子和很多弯路。
public static class GlobalData {
public static CompositionContainer MefContainer = null;
public static T GetInstance
return MefContainer.GetExportedValue
}
private static GlobalDataHolder instance;
public static GlobalDataHolder Instance {
get {
if (instance == null)
instance = new GlobalDataHolder();
return instance;
}
}
public class GlobalDataHolder : INotifyPropertyChanged {
internal GlobalDataHolder() { }
public event PropertyChangedEventHandler PropertyChanged;
public void NotifyPropertyChanged(string propertyName) {
if (PropertyChanged != null) {
PropertyChanged(this, new PropertyChangedEventArgs(propertyName));
}
}
private ViewModes viewMode;
public ViewModes ViewMode {
get {
return this.viewMode;
}
set {
if (this.viewMode != value) {
this.viewMode = value;
this.NotifyPropertyChanged("ViewMode");
}
}
}
}
}
虽然不是很美观,但是目的达到了。
来看一下 ViewModes 的定义
public enum ViewModes {
[Description("普通视图")]
Normal,
[Description("紧凑视图")]
Small
}
同样是 Normal 和 Small ,对应 Normal.xaml 和 Small.xaml
另外,有人问我,插件化开发,将 View 和 ViewMode 放到 DLL里去,提示找不到 View ,该怎么办?
我用的是 MEF,我的解决办法是在 Bootstrapper 里重写:
protected override void StartRuntime() {
base.StartRuntime();
//用 Assembly.Instance.Add 可以用于解决加载不同DLL内的View
var dllFiles = Directory.GetFiles(AppDomain.CurrentDomain.BaseDirectory, "*.dll", SearchOption.AllDirectories);
foreach (var dll in dllFiles) {
try {
var asm = Assembly.LoadFrom(dll);
if (asm.GetTypes().Any(t =>
t.GetInterfaces().Contains(typeof(IViewAware))
|| t.GetInterfaces().Contains(typeof(IScreen))
)) {
AssemblySource.Instance.Add(asm);
}
} catch {
}
}
}
////主屏幕启动后才会执行这个方法,所以 AssemblySource 的操作不能放到这里
//protected override void OnStartup(object sender, System.Windows.StartupEventArgs e) {
// base.OnStartup(sender, e);
//}
即扫描DLL内 IScreen 和 IViewAware 的实现,将相关的 Assembly 加入到 AssemblySource 内,这样就不用强引用了!
简单来说, 就是利用 AttachedProperty : View.Context 来传递一个标识符, 跟据这个标识符加载对应的视图, 如果找不到, 则使用默认的视图.
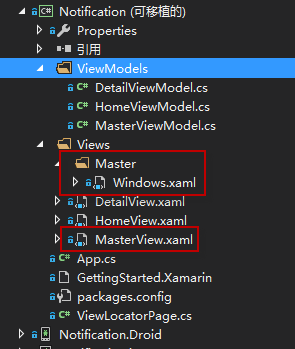
比如这个 MasterView.xaml 即默认的视图.
如果 View.Context 设为 Windows , 就会去加载 Master/Windows.xaml.
如果 View.Context 为 IOS, 但是不存在 Master/IOS.xaml , 就会默认使用 MasterView.xaml
这是 CM 的一个约定.
XF 项目的目标就是一次编写, 同时生成支持 IOS / Android / WP (SL) / UWP 的 APP.
各个平台的最终表现出什么样的用户界面 , 是由封装在不同 Xamarin.Forms.Platform 中的 Renderer 来负责呈现的.
IOS / Android 有先天的优势, 即使不怎么改, 也不会太丑, 但是 WP , 甚至新的 UWP 项目, 都需要后天的费工费时的一点一点的润色.
在给 WP / UWP 润色的同时, 又不想对 IOS / Android 有影响, CM 的多视图支持是不一个不错的选择.
嗯, 费话了一堆, 看看处理办法吧, 修改 XF 项目的 App.cs
public App(SimpleContainer container) {
this.Container = container;
this.Container
.Singleton
.Singleton
var f = ViewLocator.LocateTypeForModelType;
ViewLocator.LocateTypeForModelType = (type, bindable, context) => {
return f(type, bindable, context ?? Device.OS) ?? f(type, bindable, context);
};
this.DisplayRootView
}
在 App 的构造函数, DisplayRootView 之前, 先保存 ViewLocator.LocateTypeForModelType 到一个变量, 它是一个 Func ,
然后重写这个 Func
如果 context 为 null, 就取 Device.OS 的值.
如果跟据 指定的 conetxt 找不到视图, 就取默认的视图.
OK, 多视图的功能也完成了!
当前 XF 对 UWP 的支持还有 BUG........期待完善...
题外, 如何使用 Caliburn.Micro 对 MasterDetailPage / TabbedPage 进行 MVVM 绑定
首先, 添加一个 ViewLocatorPage, 继承自 ContentPage, 使用 CM 进行绑定
public class ViewLocatorPage : ContentPage {
public static readonly BindableProperty VMProperty = BindableProperty.Create
public Screen VM {
get {
return (Screen)this.GetValue(VMProperty);
}
set {
this.SetValue(VMProperty, value);
}
}
private static void VMChanged(BindableObject bindable, object oldValue, object newValue) {
if (newValue == null)
return;
var vm = (Screen)newValue;
//var view = vm.GetView();
var vmView = ViewLocator.LocateForModel(vm, null, null);
if (vmView == null)
throw new Exception("没有找到视图");
ViewModelBinder.Bind(vm, vmView, null);
var activator = vm as IActivate;
if (activator != null)
activator.Activate();
var page = (ViewLocatorPage)bindable;
if (null != (ContentPage)vmView) {
var vp = (ContentPage)vmView;
page.Content = vp.Content;
if (vp.ToolbarItems != null)
foreach (var t in vp.ToolbarItems)
page.ToolbarItems.Add(t);
} else if (null != (Xamarin.Forms.View)vmView) {
page.Content = (Xamarin.Forms.View)vmView;
}
}
}
对 MasterDetailPage 绑定:
xmlns:cal="clr-namespace:Caliburn.Micro.Xamarin.Forms;assembly=Caliburn.Micro.Platform.Xamarin.Forms"
x:Class="Notification.Views.HomeView"
xmlns:local="clr-namespace:Notification;assembly=Notification"
Title="Notification Test"
>
---------------------------
完, 源码:
https://*gith*u*b.com/gruan01/Xamarin-Example/tree/master/Notification.UWP
用Xamarin.Forms构建UWP应用程序
熟悉使用Xamarin.Forms的童鞋们 是不是想用Xamarin.Forms做UWP应用程序(Windows 10 通用应用程序 )
操作步骤:
1 新建一个Xamarin.Forms空白程序APP1,用NuGet程序包升级Xamarin.Forms到最新版。
2 在解决方案中新建一个Windows通用应用项目(名为APP1.UWP),在APP1.UWP子项目中,添加引用APP1,再用NuGet程序包添加Xamarin.Forms到APP1.UWP的引用中

以下在APP1.UWP子项目中修改
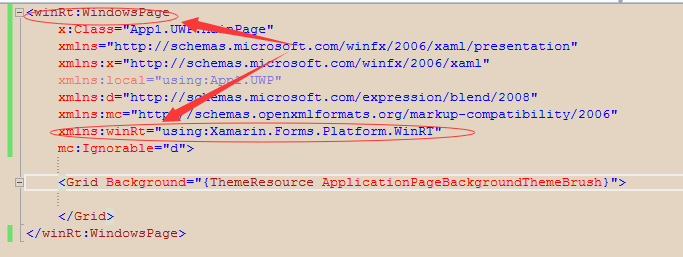
3 在MainPage.xaml中 修改根元素Page为winRt:WindowsPage 这时会自动加入xmlns:winRt="using:Xamarin.Forms.Platform.WinRT"。
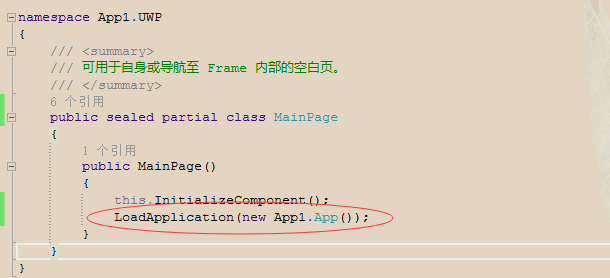
4 在MainPage.xaml.cs后台代码中作如下操作:
A 删除MainPage的继承类Page
B 在构造函数中添加一行:LoadApplication(new App1.App());
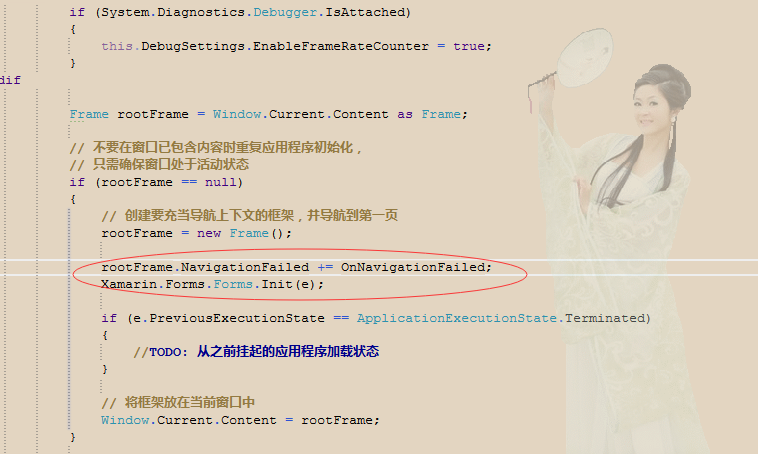
5 在 App.xaml.cs中找到: rootFrame.NavigationFailed += OnNavigationFailed;
在这一行代码的下面添加: Xamarin.Forms.Forms.Init(e);
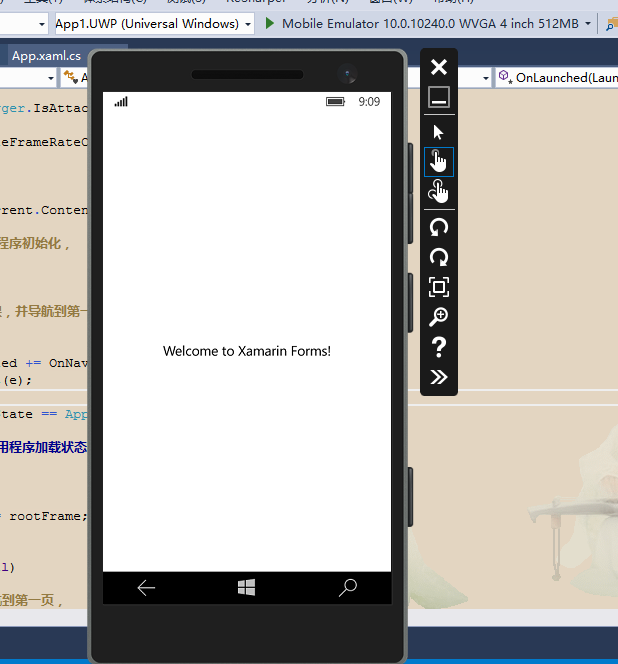
6 将App1.UWP设为启动项目,部署App1.UWP
相关文章
- 凯叔讲故事怎么设置消费限制 04-02
- 如何使用豆包AI中英对话 04-02
- PPT如何添加动画 04-02
- 剪映国际版如何设置简体中文 04-02
- 蓝海搜书在线书库入口在哪 04-02
- 移动云盘如何下载链接 04-02