


最新下载
热门教程
- 1
- 2
- 3
- 4
- 5
- 6
- 7
- 8
- 9
- 10
Python实现数字图像处理染色体计数代码示例
时间:2022-06-25 01:11:02 编辑:袖梨 来源:一聚教程网
本篇文章小编给大家分享一下Python实现数字图像处理染色体计数代码示例,文中代码介绍的很详细,小编觉得挺不错的,现在分享给大家供大家参考,有需要的小伙伴们可以来看看。
一、实验内容
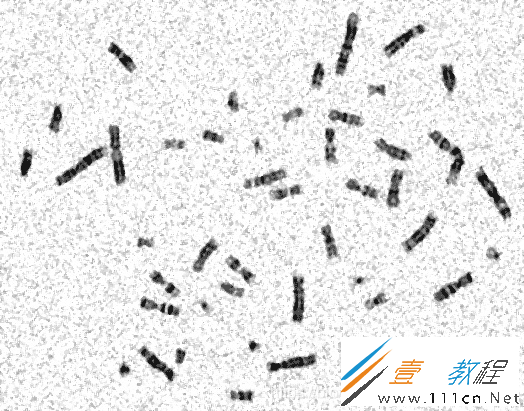
对于下面这幅图像,编程实现染色体计数,并附简要处理流程说明。

二、实验步骤
1.中值滤波
2.图像二值化
3.膨胀图像
4.腐蚀图像
5.计算光影背景
6.移除背景
7.检测染色体
三、代码
import cv2
import numpy as np
# 计算光影背景
def calculateLightPattern(img4):
    h, w = img4.shape[0], img4.shape[1]
    img5 = cv2.blur(img4, (int(w/3), int(w/3)))
    return img5
# 移除背景
def removeLight(img4, img5, method):
    if method == 1:
        img4_32 = np.float32(img4)
        img5_32 = np.float32(img5)
        ratio = img4_32 / img5_32
        ratio[ratio > 1] = 1
        aux = 1 - ratio
        # 按比例转换为8bit格式
        aux = aux * 255
        aux = np.uint8(aux)
    else:
        aux = img5 - img4
    return aux
def ConnectedComponents(aux):
    num_objects, labels = cv2.connectedComponents(aux)
    if num_objects < 2:
        print("connectedComponents未检测到染色体")
        return
    else:
        print("connectedComponents检测到染色体数量为:", num_objects - 1)
    output = np.zeros((aux.shape[0], aux.shape[1], 3), np.uint8)
    for i in range(1, num_objects):
        mask = labels == i
        output[:, :, 0][mask] = np.random.randint(0, 255)
        output[:, :, 1][mask] = np.random.randint(0, 255)
        output[:, :, 2][mask] = np.random.randint(0, 255)
    return output
def ConnectedComponentsStats(aux):
    num_objects, labels, status, centroids = cv2.connectedComponentsWithStats(aux)
    if num_objects < 2:
        print("connectedComponentsWithStats未检测到染色体")
        return
    else:
        print("connectedComponentsWithStats检测到染色体数量为:", num_objects - 1)
    output = np.zeros((aux.shape[0], aux.shape[1], 3), np.uint8)
    for i in range(1, num_objects):
        mask = labels == i
        output[:, :, 0][mask] = np.random.randint(0, 255)
        output[:, :, 1][mask] = np.random.randint(0, 255)
        output[:, :, 2][mask] = np.random.randint(0, 255)
    return output
def FindContours(aux):
    contours, hierarchy = cv2.findContours(aux, cv2.RETR_EXTERNAL, cv2.CHAIN_APPROX_SIMPLE)
    if len(contours) == 0:
        print("findContours未检测到染色体")
        return
    else:
        print("findContours检测到染色体数量为:", len(contours))
    output = np.zeros((aux.shape[0], aux.shape[1], 3), np.uint8)
    for i in range(len(contours)):
        cv2.drawContours(
            output,
            contours,
            i,
            (np.random.randint(0, 255),
             np.random.randint(0, 255),
             np.random.randint(0, 255)), 2)
    return output
# 读取图片
img = cv2.imread('img.png', 0)
pre_img = cv2.cvtColor(img, cv2.COLOR_BGR2RGB)  # 二值化函数
# 第一步:中值滤波
# 中值滤波
img1 = cv2.medianBlur(img, 3)
# 显示并保存图片
cv2.imshow('gray', img)
cv2.imshow('medianBlur', img1)
cv2.imwrite('medianBlur.jpg', img1)
# 第二步:图像二值化
# 图像二值化
ret, img2 = cv2.threshold(img1, 140, 255, 0, img1)  # 二值化函数
# 显示并保存图片
cv2.imshow('threshold', img2)
cv2.imwrite('threshold.jpg', img2)
# 第三步:膨胀图像
dilate_kernel = np.ones((3, 3), np.uint8)
img3 = cv2.dilate(img2, dilate_kernel)
# 显示并保存图片
cv2.imshow('dilate', img3)
cv2.imwrite('dilate.jpg', img3)
# 第四步:腐蚀图像
erode_kernel = np.ones((7, 7), np.uint8)
img4 = cv2.erode(img3, erode_kernel)
# 显示并保存图片
cv2.imshow('erode', img4)
cv2.imwrite('erode.jpg', img4)
# 第五步:计算光影背景
img5 = calculateLightPattern(img4)
# 显示并保存图片
cv2.imshow('LightPattern', img5)
cv2.imwrite('LightPattern.jpg', img5)
# 第六步:移除背景
aux = removeLight(img4, img5, 1)
# 显示并保存图片
cv2.imshow('removeLight', aux)
cv2.imwrite('removeLight.jpg', aux)
# 第七步:检测轮廓
output1 = ConnectedComponents(aux)
output2 = ConnectedComponentsStats(aux)
output3 = FindContours(aux)
# 显示并保存图片
cv2.imshow('connectedComponents', output1)
cv2.imwrite('connectedComponents.jpg', output1)
cv2.imshow('connectedComponentsWithStats', output2)
cv2.imwrite('connectedComponentsWithStats.jpg', output2)
cv2.imshow('findContours', output3)
cv2.imwrite('findContours.jpg', output3)
cv2.waitKey(0)
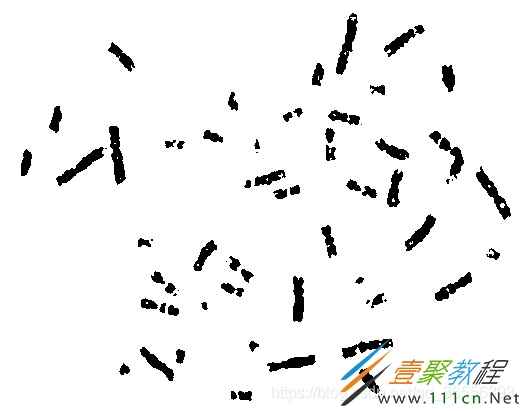
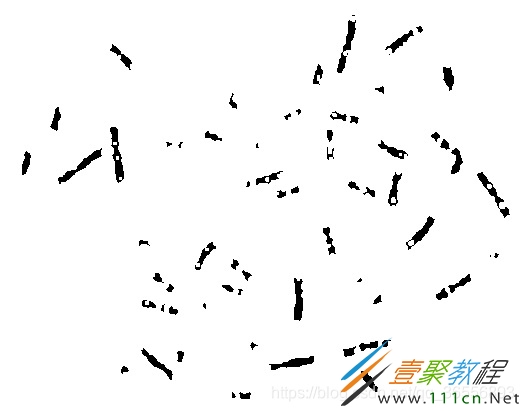
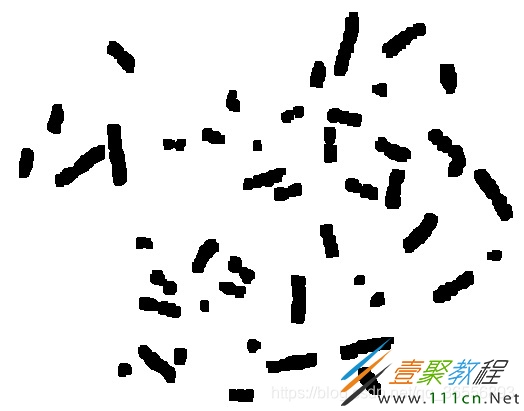
四、结果
1.中值滤波
2.图像二值化
3.膨胀图像
4.腐蚀图像
5.计算光影背景

6.移除背景
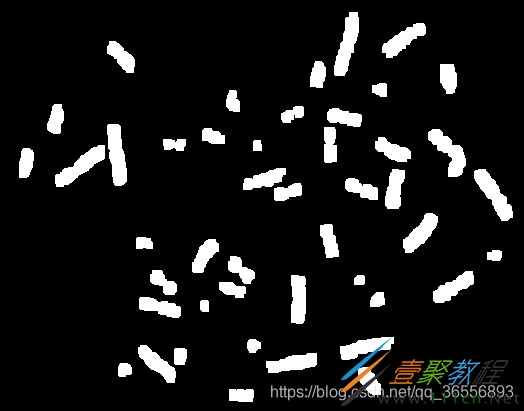
7.检测染色体
(1)connectedComponents.jpg

(2)connectedComponentsWithStats.jpg

(3)findContours.jpg

染色体个数为46
相关文章
- 原神阿蕾奇诺传说任务怎么做 04-25
- 暗黑破坏神不朽风之锤炼在哪刷 暗黑破坏神手游不朽风之锤炼在哪掉 04-25
- 女神异闻录夜幕魅影宫下美波怎么样 04-25
- 原神4.6新增书籍北境秘史在哪 04-25
- 奇迹暖暖春日蜜语怎么获得 04-25
- 原神4.6新增水神瞳收集攻略 04-25