提到Silverlight中的文件操作,第一个肯定是独立存储Isolated Store,这个东东相当于于一个本地的小型存储空间,通过它可以把一些不重要的数据(用户的一些配置信息或者文件)
IsolatedStorageFile:
保存在客户端,由于这个空间是可以在本地查看得到,同时用户也可以随意的删除这些文件件以及文件,所以不要存放重要的信息。
IsolatedStorageFile.GetUserStoreForApplication();得到基于当前用户和当前应用程序的IsolatedStorageFile。
IsolatedStorageFile.GetUserStoreForSite();得到基于当前website域的所有IsolatedStorageFile(不止一个Application的,可能同一个website下有多个xap文件,那么这些是共享的),这样就可以在多个Application中共享信息。
下面先看下独立存储的规则:
1.不同的XAP文件,在同一个website下并且在同一个文件夹有不同的独立存储文件
2.如果Application在不同的site宿主,则有自己的独立存储文件
3.如果使用不同的TestPage,使用同一个XAP,则使用同一个独立存储文件
4.如果重命名XAP文件,则使用不同的独立存储文件
5.如果修改版本信息,等其他的程序及配置信息,则还使用同一个独立存储文件
6.如果替换一个名字一样的XAP文件,则还使用之前的独立存储文件
IsolatedStorageFile操作文件的方法:
CreateDirectory() 创建一个文件夹在Isolated Store,根据用户指定的名字。
DeleteDirectory() 删除一个文件夹,根据用户指定的名字。
CreateFile() 创建一个文件,根据用户指定的名字,并且返回IsolatedStorageFileStream对象,可以用来进行写入操作。
DeleteFile() 删除一个文件,根据指定的名字。
Remove() 移除Isolated Store对象,包含所有的文件夹和文件。
OpenFile() 打开一个文件,并且返回IsolatedStorageFileStream对象。
FileExists() 判断一个文件是否存在,返回true或者false。
DirectoryExists() 判断一个文件夹是否存在,返回true或者false。
GetFileNames() 获得根目录(指定的目录)下的所有文件名称,返回一个string的array。
GetDirectoryNames() 获得根目录(指定目录下)的所有文件夹名称,返回一个string的array
使用IsolatedStorageFile读写数据:
StreamWriter和StreamReader用来读取和写入文本信息;
BinaryWriter和BinaryReader用来读取和写入二进制信息.
例子:
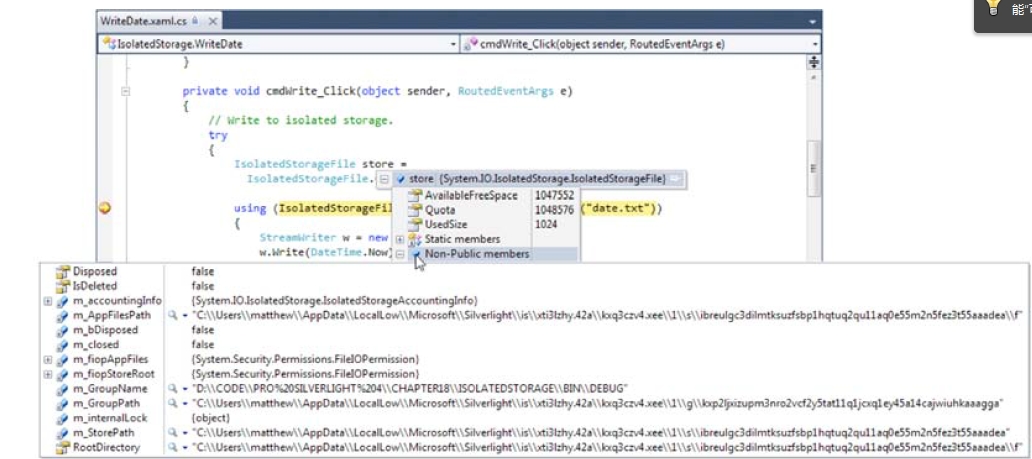
如果使用Windows vista或者Windows 7系统,则独立存储的文件在C:Users[UserName]AppDataLocalLowMicrosoftSilverlightis目录。
当然在调试时候也可以看到,如下图:
创建文件:
| 代码如下 |
复制代码 |
|
IsolatedStorageFile storageFile=IsolatedStorageFile.GetUserStoreForApplication();
IsolatedStorageFileStream myfs = storeFile.CreateFile(filePath);
using (StreamWriter mysw = new StreamWriter(myfs))
{
mysw.WriteLine(content);
}
|
通过使用IsolatedStorageFile.CreateFile创建一个文件,得到返回的IsolatedStorageFileStream对象,使用该对象创建StreamWriter对象调用WriteLine方法写入一行数据。
读取文件:
| 代码如下 |
复制代码 |
|
//使用这个方法合并目录和文件路径
string path = System.IO.Path.Combine(this.txtDirectionName.Text,this.txtFileName.Text);
//判断是否存在这个文件
if (storageFile.FileExists(path))
{
//创建一个读取流,参数为OpenIFile方法读取指定位置文件的流
StreamReader sw = new StreamReader(storageFile.OpenFile(path, FileMode.Open, FileAccess.Read));
//读取文件内容
this.txtFileContent.Text = sw.ReadToEnd();
}
|
首先判断是否存在该文件,如果存在则调用IsolatedStorageFile.OpenFile函数返回一个IsolatedStorageFileStream对象,使用该对象创建StreamReader对象调用ReadToEnd
函数得到文本信息。
删除文件:
| 代码如下 |
复制代码 |
|
IsolatedStorageFile storageFile=IsolatedStorageFile.GetUserStoreForApplication();
storageFile.DeleteFile(path);
|
创建目录:
| 代码如下 |
复制代码 |
|
IsolatedStorageFile storageFile=IsolatedStorageFile.GetUserStoreForApplication();
storageFile.CreateDirectory(path);
|
获得列目录(即获得指定目录或者整个应用程序的目录):
| 代码如下 |
复制代码 |
|
IsolatedStorageFile storageFile=IsolatedStorageFile.GetUserStoreForApplication();
storageFile.GetDirectoryNames("*");//当前的*表示获得所有的目录
|
删除目录:
| 代码如下 |
复制代码 |
|
IsolatedStorageFile storageFile=IsolatedStorageFile.GetUserStoreForApplication();
storageFile.DeleteDirectory(path);
|
添加空间:
默认的存储空间是1MB,当程序以OOB模式运行时候,则会增加到25MB,不管是 OOB还是Web模式,都是使用同一个独立存储。
如果要增加存储空间,则调用IsolatedStorageFile.IncreaseQuotaTo()来增加到想要的空间大小,这里是按字节来算。
使用该方法需要注意两点:
1.该方法需要在事件中调用,切忌在Load中调用
2.该方法增加的值需要大于当前的空间,否则会出现错误
使用SolatedStorageFile.Quota得到当前独立存储的空间大小。
使用IsolatedStorageFile.AvailableFreeSpace得到当前可用的独立存储空间大小。
通过XmlSerializer存储Object对象:
其实这个功能还是很好用的,也是很有用,通过XmlSerializer将对象进行序列化保存在文件中,当我们需要的时候再通过XmlSerializer进行反序列化得到使用的对象。
XmlSerializer通过转换字节流对象来实现整个的序列化和反序列化,是可以针对任何Stream的。
使用XmlSerializer步骤如下:
1.添加System.Xml.Serializtion.dll
2.类需要提供一个无参的构造函数
3.类需要有公有的setter属性构成,当XmlSerializer进行序列化和反序列化的时候则会使用到这些属性,则忽略私有的字段
下面来一个完整的例子:
User实体类:
| 代码如下 |
复制代码 |
|
public class User
{
public string FirstName { get; set; }
public string LastName { get; set; }
public DateTime? DateOfBirth { get; set; }
public User(string firstName, string lastName, DateTime? dateOfBirth)
{
FirstName = firstName;
LastName = lastName;
DateOfBirth = dateOfBirth;
}
public User() { }
}
|
XAML代码:
效果图如下:
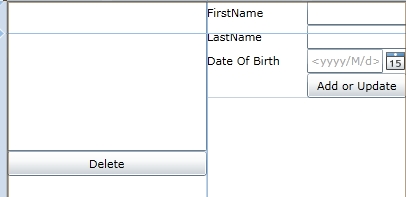
左边一个ListBox显示所有的FileName,可以进行删除,当选择一个ListItem项 则在右边显示对应的对象的信息.
下面是Xaml.cs代码:
| 代码如下 |
复制代码 |
|
public partial class IsolatedStoreByXmlSerializer : UserControl
{
public IsolatedStoreByXmlSerializer()
{
InitializeComponent();
this.Loaded += new RoutedEventHandler(IsolatedStoreByXmlSerializer_Loaded);
this.lstUsers.SelectionChanged += new SelectionChangedEventHandler(lstUsers_SelectionChanged);
}
void lstUsers_SelectionChanged(object sender, SelectionChangedEventArgs e)
{
using (IsolatedStorageFile store = IsolatedStorageFile.GetUserStoreForApplication())
{
//得到选中的项对应的File
using (StreamReader sr = new StreamReader(store.OpenFile(lstUsers.SelectedItem.ToString(), FileMode.Open, FileAccess.Read)))
{
//进行反序列化操作
User user = (User)serializer.Deserialize(sr);
txtFirstName.Text = user.FirstName;
txtLastName.Text = user.LastName;
dateBirth.SelectedDate = user.DateOfBirth;
}
}
}
//定义序列化对象,当前类型为User
private XmlSerializer serializer = new XmlSerializer(typeof(User));
void IsolatedStoreByXmlSerializer_Loaded(object sender, RoutedEventArgs e)
{
using (IsolatedStorageFile store = IsolatedStorageFile.GetUserStoreForApplication())
{
//得到所有的后缀为.user的文件
lstUsers.ItemsSource = store.GetFileNames("*.user");
}
}
private void btnModify_Click(object sender, RoutedEventArgs e)
{
//实例化对象,值为文本输入的值
User user = new User() { FirstName = txtFirstName.Text, LastName = txtLastName.Text, DateOfBirth =dateBirth.SelectedDate};
using (IsolatedStorageFile store = IsolatedStorageFile.GetUserStoreForApplication())
{
//得到创建文件的流
using (StreamWriter sw = new StreamWriter(store.CreateFile(user.FirstName + user.LastName + ".user")))
{
//进行序列化操作
serializer.Serialize(sw, user);
}
lstUsers.ItemsSource = store.GetFileNames("*.user");
}
}
private void btnDelete_Click(object sender, RoutedEventArgs e)
{
using (IsolatedStorageFile store = IsolatedStorageFile.GetUserStoreForApplication())
{
//如果选择的项不为空
if (lstUsers.SelectedItem != null)
{
//删除选中的文件
store.DeleteFile(lstUsers.SelectedItem.ToString());
lstUsers.ItemsSource = store.GetFileNames("*.user");
}
}
}
}
|
在代码中实现的功能是,在右边可以进行新增一个File文件,在左边显示完整的File的列表,当选中一项会在右边显示其对应的详细信息,当然也可以进行删除操作。
IsolatedStorageSettings :
可以看到在上边中使用IsolatedStorageFile多用来操作文档等文件,在Silverlight中还提供了一个很有用的对象IsolatedStorageSettings,可以用来保存一些信息,这些信息是
直观的,也就是可以直接拿来使用,该对象是一个键对值的形式存在,该对象提供了两个属性ApplicationSettings和SiteSettings,同样的前者表示当前Application的存储数据,
后者表示当前website域的存储数据。这个对象有点类似于Cookie的形式在存放,当你关闭网页,或者是重新登录,这些信息还都是存在的。
例子:
| 代码如下 |
复制代码 |
|
IsolatedStorageSettings userSettings = IsolatedStorageSettings.SiteSettings;
userSettings["fly"] = "fly";
userSettings["user"] = new User() { FirstName="wang", LastName="Fly", DateOfBirth=DateTime.Now };
User user = (User)userSettings["user"];
|
可以看到,Setting是不仅可以存放简单的数据,也可以存放复杂的类型。
OpenFileDialog:
没错,就是这个OpenFileDialog,和之前的使用方法一摸一样,同样是先打开选择窗体,选择文件,点击确定,处理文件。
| 代码如下 |
复制代码 |
|
OpenFileDialog dialog = new OpenFileDialog();
|
实例化OpenFileDialog;
指定Dialog的筛选器类型字符串:
dialog.Filter = "Text Files (*.txt)|*.txt";
选择不同类型的文件:
| 代码如下 |
复制代码 |
|
dialog.Filter = "Bitmaps (*.bmp)|*.bmp|JPEGs (*.jpg)|*.jpg|All files (*.*)|*.*";
或者:
dialog.Filter = "Image Files (*.bmp;*.jpg;*.gif)|*.bmp;*.jpg;*.gif";
|
通常来说处理读取分为两类,文本和非文本,文本很简单直接使用OpenFileDialog.OpenText();如果是二进制的则需要使用OpenFileDialog.OpenRead()。
读取文本:
| 代码如下 |
复制代码 |
|
OpenFileDialog fileDialog = new OpenFileDialog();
fileDialog.Filter = "Text Files (*.txt)*.txt";
if (fileDialog.ShowDialog() == true)
{
using (StreamReader sr = fileDialog.File.OpenText())
{
lblMsg.Text = sr.ReadToEnd();
}
}
|
是不是很简单呢。
读取非文本(当前例子是Image):
| 代码如下 |
复制代码 |
|
OpenFileDialog fileDialog = new OpenFileDialog();
fileDialog.Filter = "Images Files (*.bmp;*.jpg;*.gif)|*.bmp;*.jpg;*.gif";
if (fileDialog.ShowDialog() == true)
{
using (IsolatedStorageFile store = IsolatedStorageFile.GetUserStoreForApplication())
{
using (Stream fileStream = fileDialog.File.OpenRead())
{
//如果当前的文件超过了可使用的空间,则增加空间
if (fileStream.Length > store.AvailableFreeSpace)
{
store.IncreaseQuotaTo(fileStream.Length);
}
using (IsolatedStorageFileStream storeStraem=store.CreateFile(fileDialog.File.Name))
{
byte [] buffer=new byte[1024];
int count = 0;
do
{
count = fileStream.Read(buffer,0,buffer.Length);
if (count > 0) storeStraem.Write(buffer,0,buffer.Length);
} while (count>0);
}
}
}
}
|
首先使用OpenFileDialog.File.OpenRead()得到Stream流,判断当前流的长度和独立存储的可用空间大小,如果大于独立存储则增加独立存储空间;
使用IsolatedStorageFile.CreateFile创建文件并且得到IsolatedStorageFileStream对象;然后定了一个byte的数组用于读取文件流中的数据,暂且为1024字
节长度,通过Stream.Read方法判断当前是否还存在未读取的数据,如果存在则使用IsolatedStorageFileStream.Write向文件中写入数据,并且使用循环来实现。
并且OpenFileDialog支持多选,设置OpenFileDialog.Multiselect为ture则可实现多选,为false禁止多选,多选后使用OpenFileDialog.Files属性得到。
修改如下:
| 代码如下 |
复制代码 |
|
OpenFileDialog fileDialog = new OpenFileDialog();
fileDialog.Filter = "Images Files (*.bmp;*.jpg;*.gif)|*.bmp;*.jpg;*.gif";
if (fileDialog.ShowDialog() == true)
{
using (IsolatedStorageFile store = IsolatedStorageFile.GetUserStoreForApplication())
{
//遍历Files,得到FileInfo对象
foreach (FileInfo file in fileDialog.Files)
{
using (Stream fileStream = file.OpenRead())
{
//如果当前的文件超过了可使用的空间,则增加空间
if (fileStream.Length > store.AvailableFreeSpace)
{
store.IncreaseQuotaTo(fileStream.Length);
}
using (IsolatedStorageFileStream storeStraem = store.CreateFile(fileDialog.File.Name))
{
byte[] buffer = new byte[1024];
int count = 0;
do
{
count = fileStream.Read(buffer, 0, buffer.Length);
if (count > 0) storeStraem.Write(buffer, 0, buffer.Length);
} while (count > 0);
}
}
}
}
}
|
修改后的代码如上,添加了对文件的遍历操作。
通过Webservice上传和下载文件:
service端代码:
| 代码如下 |
复制代码 |
|
///
/// 获取文件列表
///
///
[WebMethod]
public string[] GetFileList()
{
//得到指定目录下的所有文件列表
string[] files = Directory.GetFiles(FilePath);
for (int i = 0; i < files.Length; i++)
{
//得到文件的名称
files[i] = Path.GetFileName(files[i]);
}
return files;
}
///
/// 下载文件
///
/// 文件名称
///
[WebMethod]
public byte[] DownloadFile(string fileName)
{
string file = Path.Combine(FilePath,fileName);
using (FileStream myfs=new FileStream (file,FileMode.Open))
{
byte[] bytes=new byte[myfs.Length];
myfs.Read(bytes,0,bytes.Length);
return bytes;
}
}
///
/// 上传文件
///
/// 文件名称
/// 文件字节数组
[WebMethod]
public void UploadFile(string fileName,byte[] bytes)
{
string file = Path.Combine(FilePath,fileName);
using (FileStream myfs=new FileStream (file,FileMode.Create))
{
myfs.Write(bytes, 0, bytes.Length);
}
}
|
以上有三个方法,分别为获得文件列表,上传文件和下载文件。
看下前台的操作:
就是一个StackPanel然后一个ListBox显示文件名称列表,两个按钮一个是上传一个是下载。
| 代码如下 |
复制代码 |
|
Xaml后台代码如下:
public partial class OperateFileByService : UserControl
{
public OperateFileByService()
{
InitializeComponent();
this.Loaded += new RoutedEventHandler(OperateFileByService_Loaded);
}
private FileServiceSoapClient proxy = new FileServiceSoapClient();
void OperateFileByService_Loaded(object sender, RoutedEventArgs e)
{
proxy.GetFileListCompleted += new EventHandler(proxy_GetFileListCompleted);
proxy.GetFileListAsync();
proxy.CloseAsync();
}
void proxy_GetFileListCompleted(object sender, GetFileListCompletedEventArgs e)
{
lstFile.ItemsSource = e.Result;
}
private void btnDownload_Click(object sender, RoutedEventArgs e)
{
if (lstFile.SelectedIndex !=-1)
{
string fileName = lstFile.SelectedItem.ToString();
SaveFileDialog saveDialog = new SaveFileDialog();
//saveDialog.DefaultExt = "jpg";
if (saveDialog.ShowDialog() == true)
{
proxy.DownloadFileCompleted += new EventHandler(proxy_DownloadFileCompleted);
proxy.DownloadFileAsync(fileName, saveDialog);
}
}
}
void proxy_DownloadFileCompleted(object sender, DownloadFileCompletedEventArgs e)
{
if (e.Error == null)
{
//得到下载的字节数据数组
byte[] data = e.Result;
SaveFileDialog saveDialog = (SaveFileDialog)e.UserState;
using (Stream fs = saveDialog.OpenFile())
{
fs.Write(data, 0, data.Length);
}
}
}
private void btnUpload_Click(object sender, RoutedEventArgs e)
{
OpenFileDialog fileDialog = new OpenFileDialog();
if (fileDialog.ShowDialog()==true)
{
try
{
using (Stream stream= fileDialog.File.OpenRead())
{
if (stream.Length < 5120000)
{
byte[] data = new byte[stream.Length];
stream.Read(data, 0, data.Length);
proxy.UploadFileCompleted +=new EventHandler(proxy_UploadFileCompleted);
proxy.UploadFileAsync(fileDialog.File.Name, data);
}
else
{
MessageBox.Show("文件大于5MB");
}
}
}
catch (Exception)
{
throw;
}
}
}
void proxy_UploadFileCompleted(object sender, System.ComponentModel.AsyncCompletedEventArgs e)
{
if (e.Error==null)
{
proxy.GetFileListAsync();
}
}
}
|


